This is the full developer documentation for Round Robin
# How can we help?
> Everything you need to set up and run on-call rotations, right inside Slack.
## Start here
[Section titled “Start here”](#start-here)
Install & permissions
Add Round Robin to your workspace and understand exactly which Slack scopes it asks for — and why.
[Set up Round Robin →](/setup/permission-scopes/)
Your first rotation
Create a rotation, add teammates, and pick who goes first. You’ll be live in a couple of minutes.
[Create a rotation →](/rotation-management/create-a-rotation/)
Put it on a schedule
Rotate daily, weekly, or on your own cadence — including business-hours-only coverage.
[Configure schedules →](/rotation-management/create-or-edit-a-schedule/)
On-duty groups
Keep a Slack user group like `@oncall` always pointing at whoever is on duty.
[Sync a user group →](/groups-management/using-on-duty-handle/)
## Go further
[Section titled “Go further”](#go-further)
Mentions
Route `@rotation` mentions in any channel to the people currently on call.
[How mentions work →](/mentions/what-are-mentions/)
Customize messages
Templating tokens, custom duty messages, and automatic channel-topic updates.
[Make it yours →](/customizations/templating/)
Integrations
Google Calendar, PagerDuty, OpsGenie, GitHub, and outbound webhooks.
[Connect your stack →](/integrations/google-calendar-sync/)
Billing
Plans, quotas, and managing your subscription.
[Billing & plans →](/billing/billing/)
## Popular articles
[Section titled “Popular articles”](#popular-articles)
[Create or edit a schedule](/rotation-management/create-or-edit-a-schedule/)Rotation cadences, start times, and how schedule changes take effect.
[Templating tokens](/customizations/templating/)Every replacement token you can use in duty messages and channel topics.
[Using the on-duty handle](/groups-management/using-on-duty-handle/)Keep @oncall pointing at the right person, automatically.
[PagerDuty & OpsGenie rotations](/integrations/pagerduty-based-rotations/)Mirror an existing PagerDuty or OpsGenie schedule into Slack.
***
Built for AI assistants too
These docs are machine-readable: point your agent at [/llms.txt](/llms.txt) for an index or [/llms-full.txt](/llms-full.txt) for the full content in one file.
# Plans and billing
> Free and Pro plan limits, how users are counted for billing, and how to manage your subscription.
Round Robin has a Free plan and paid Pro plans (monthly or yearly). This page explains the plan limits, how billed users are counted, and where you manage your subscription.
## Plans at a glance
[Section titled “Plans at a glance”](#plans-at-a-glance)
| Plan | Rotations | Users | Price |
| ------------- | --------- | ------------------------------- | -------------------------- |
| Free | 2 | 8 | Free |
| Pro (monthly) | Unlimited | Pay per user in rotation | 2.5 EUR per user per month |
| Pro (yearly) | Unlimited | Fixed number of purchased seats | 27 EUR per user per year |
All features are included in every paid plan; the plans differ only in limits and billing period.
## Manage your subscription in the dashboard
[Section titled “Manage your subscription in the dashboard”](#manage-your-subscription-in-the-dashboard)
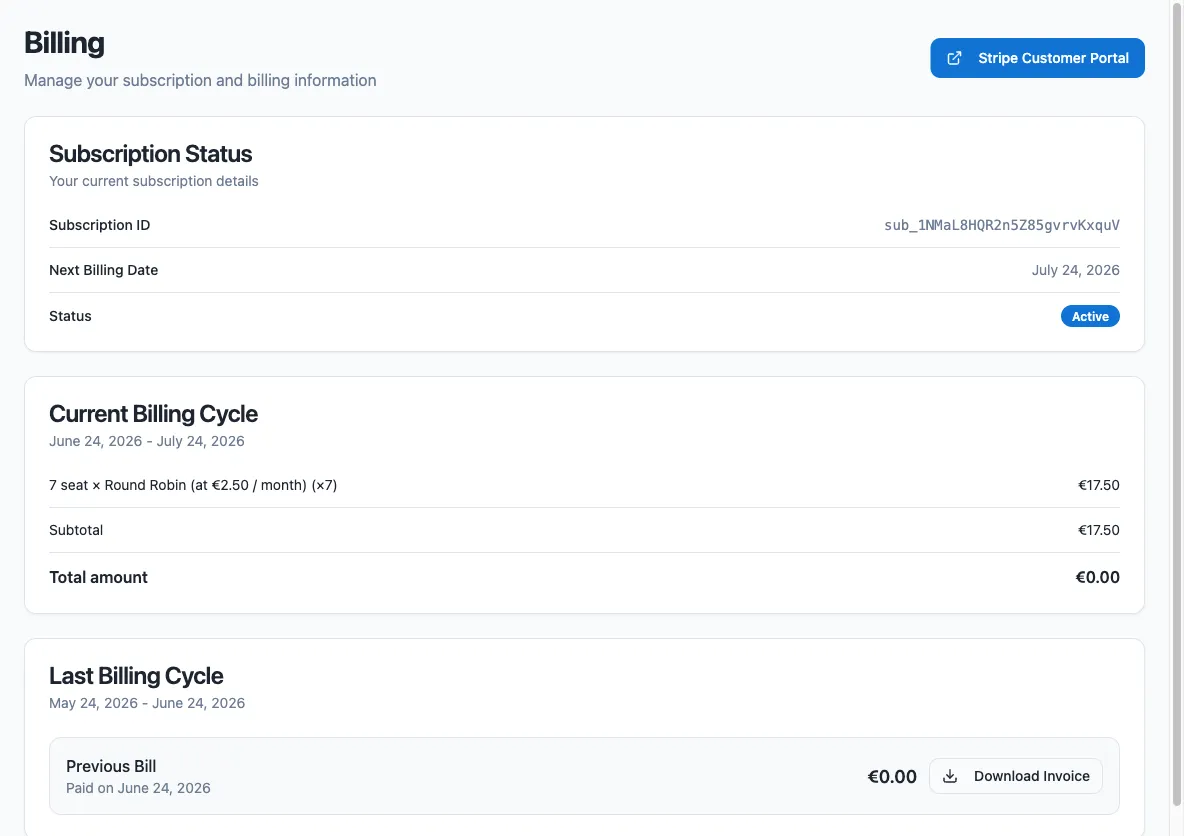
Billing lives in the dashboard at [app.roundrobinbot.eu](https://app.roundrobinbot.eu), under **Settings → Billing**.
1. Open **Settings → Billing**.
2. On the Free plan, select a Pro plan (and, for the yearly plan, the number of seats), then complete checkout through Stripe.
3. On a paid plan, use the **Stripe Customer Portal** button to update your payment method, download invoices, or cancel the subscription. The Billing page also shows your subscription status, next billing date, and current and previous invoices.
Note
Billing actions are restricted to the subscription owner — the person who purchased the plan. Other users see a read-only notice on the Billing page.
## What happens when you exceed your limits
[Section titled “What happens when you exceed your limits”](#what-happens-when-you-exceed-your-limits)
If your workspace goes above its plan limits (for example, more than 2 rotations or 8 users in rotation on the Free plan):
* Scheduled rotations are suspended — nobody rotates automatically until you are back within the limits.
* Manual rotation is blocked as well.
* You cannot create new rotations while at or above the rotation limit.
The dashboard shows a warning banner when your team is at or above quota. To resolve it, remove rotations or users, or upgrade your plan.
## How users are counted
[Section titled “How users are counted”](#how-users-are-counted)
You pay only for users who are members of a rotation. The total number of people in your Slack workspace is irrelevant: if 20 users are in rotation in a workspace of a thousand, you pay for 20.
### Monthly plan
[Section titled “Monthly plan”](#monthly-plan)
On the monthly plan you are billed for the **maximum** number of users in rotation at any point during the billing cycle:
| Start of cycle | Peak during cycle | End of cycle | Billed users |
| -------------- | ----------------- | ------------ | ------------ |
| 10 users | 20 users | 20 users | 20 users |
| 10 users | 10 users | 5 users | 10 users |
Note
The billing cycle starts on the day you upgrade to Pro, not on the first day of the calendar month.
### Yearly plan
[Section titled “Yearly plan”](#yearly-plan)
On the yearly plan you purchase a fixed number of seats and are charged at the start of the yearly cycle. The number of seats becomes your user limit: if you put more users in rotation than you purchased, the over-quota rules above apply until you reduce usage or buy more seats.
## Failed payments
[Section titled “Failed payments”](#failed-payments)
If a payment fails, the subscription owner receives an email with a link to fix the payment method, and the dashboard shows a warning. If the payment fails more than once, your workspace is blocked (limits drop to zero) until the invoice is paid.
## Canceling your plan
[Section titled “Canceling your plan”](#canceling-your-plan)
You can cancel your subscription at any time from the Stripe Customer Portal. If you cancel, the subscription stays active until the end of the current billing cycle — you pay for the remaining cycle under the normal Pro rules — and then your workspace returns to the Free plan and its limits. Until the end date you can restore the subscription from the Stripe Customer Portal.
# Customize Rotation Messages
> Replace the default channel and direct messages Round Robin sends with your own per-rotation templates, or turn individual messages off.
Round Robin posts messages to your rotation channels and sends direct messages to your users whenever duty changes. On the **Message Templates** page you can replace any of these messages with your own template — and you can enable or disable each template individually.
## Open the Message Templates page
[Section titled “Open the Message Templates page”](#open-the-message-templates-page)
1. Open the dashboard at [app.roundrobinbot.eu](https://app.roundrobinbot.eu) and select your rotation.
2. On the rotation details page, click **Configure** and choose **Templates**.
The page shows two groups of messages: **Channel Messages** and **User Messages**.
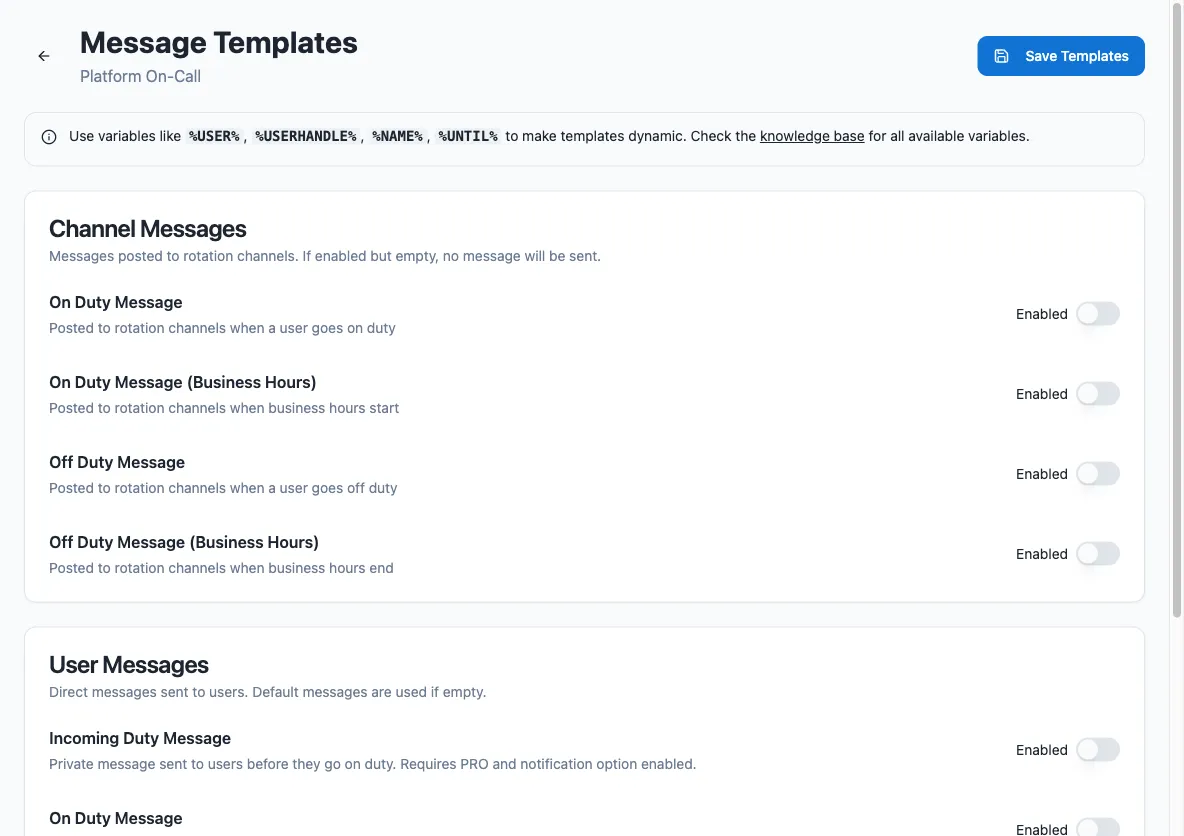
## Available messages
[Section titled “Available messages”](#available-messages)
| Group | Message | Sent when |
| ---------------- | --------------------------------- | ----------------------------------------------------- |
| Channel Messages | On Duty Message | A user goes on duty (posted to the rotation channels) |
| Channel Messages | On Duty Message (Business Hours) | Business hours start |
| Channel Messages | Off Duty Message | A user goes off duty |
| Channel Messages | Off Duty Message (Business Hours) | Business hours end |
| User Messages | Incoming Duty Message | Sent privately to a user before they go on duty |
| User Messages | On Duty Message | Sent privately to a user when they go on duty |
| User Messages | Incoming Off Duty Message | Sent privately to a user before they go off duty |
| User Messages | Off Duty Message | Sent privately to a user when they go off duty |
Note
The two *Incoming* messages require a PRO plan and the corresponding duty notification option to be enabled for the rotation. The *Business Hours* messages only apply to [business hours rotations](/rotation-management/business-hours-rotations/).
## Enable and edit a template
[Section titled “Enable and edit a template”](#enable-and-edit-a-template)
1. Turn on the **Enabled** switch next to the message you want to customize.
2. Type your template in the text box. Use [replacement tokens](/customizations/templating/) such as `%USER%`, `%USERHANDLE%`, `%NAME%`, and `%UNTIL%` to insert dynamic content.
3. Check the result in the blue **Preview** box below the text box — it updates automatically as you type, using your rotation’s real data.
4. Click **Save Templates**.
## How the Enabled switch works
[Section titled “How the Enabled switch works”](#how-the-enabled-switch-works)
Each message follows the same rules, with one exception noted below:
| Switch | Template text | Result |
| ------ | ------------- | ---------------------------------------------------------------------------- |
| Off | Anything | Round Robin sends its default message. Your template text is kept for later. |
| On | Filled in | Round Robin sends your custom message. |
| On | Empty | That message is not sent at all. |
This gives you two useful moves:
* **Pause a customization without losing it:** turn the switch off. The default message comes back, and your template is still there when you re-enable it.
* **Silence a message entirely:** turn the switch on and leave the template empty. For example, you can suppress the channel off-duty message while keeping the on-duty announcement.
Note
The two *Incoming* messages cannot be silenced this way: if their template is enabled but empty, Round Robin sends the default incoming-duty message instead. To stop them, turn off the corresponding duty notification option for the rotation.
Tip
Templates can only be edited while the rotation is enabled, and only by users with edit permission on the rotation.
# Templating tokens
> Reference of the replacement tokens you can use in custom duty messages and channel topics.
Wherever Round Robin lets you write a custom text — duty messages or channel topics, for example — you can insert replacement tokens. Round Robin replaces each token with live rotation data when it sends the message or updates the topic.
## Where to write templates
[Section titled “Where to write templates”](#where-to-write-templates)
Templates are edited in the [web dashboard](https://app.roundrobinbot.eu):
1. Open [app.roundrobinbot.eu](https://app.roundrobinbot.eu) and select your rotation.
2. Click **Configure** and choose **Templates** to customize duty messages, or **Topic** to customize the channel topic.
3. Type your template using the tokens below, check the live preview under the text box, and save.

See [Message management](/customizations/message-management/) and [Topic management](/customizations/topic-management/) for the full details of each page.
## Token rules
[Section titled “Token rules”](#token-rules)
A few rules apply everywhere:
* Where Slack markdown is supported, you can format your text freely. See the [Slack formatting guidelines](https://api.slack.com/reference/surfaces/formatting). Slack markdown does **not** work in channel topics.
* Where Slack markdown is not supported (again: topics), use the `TEXTONLY` variant of a token where available. It renders the handle as plain text instead of a clickable mention.
* To write a multiline message, press Return and keep typing. Do not type a literal `\n`.
* If a token has no value in the current context, Round Robin replaces it with `N/A`.
## Rotation properties
[Section titled “Rotation properties”](#rotation-properties)
| Token | Description |
| ------------------ | ------------------------------------------------------------------- |
| `%NAME%` | The rotation name (for example “Standup”). |
| `%DESCRIPTION%` | The rotation description, if set. |
| `%DUTY_SIZE%` | The number of people on duty at the same time (usually 1). |
| `%ROTATION_NOTES%` | The rotation notes. Replaced with empty text if there are no notes. |
## Users on duty
[Section titled “Users on duty”](#users-on-duty)
| Token | Description |
| ----------------------- | ------------------------------------------------------------------------------------ |
| `%USER%` | The real name of the user on duty (for example “Robert Redford”). |
| `%USERHANDLE%` | The handle of the user on duty (for example “@robert”) as a clickable Slack mention. |
| `%USERHANDLE_TEXTONLY%` | The handle of the user on duty as plain text. |
| `%USERID%` | The Slack ID of the user on duty. |
### Multi-user rotations and numbered tokens
[Section titled “Multi-user rotations and numbered tokens”](#multi-user-rotations-and-numbered-tokens)
If more than one user is on duty, the tokens above expand to the whole group: `%USER%` becomes “A and B”.
To target a single user, append their position (1-based) to the token name. For example, with users A and B on duty, `%USER1%` produces “A”. If the position exceeds the number of users on duty, the token produces `N/A`.
Numbered forms work for all the on-duty and next-on-duty user tokens, for example `%USERHANDLE1%`, `%USERID2%`, or `%NEXT_USERHANDLE_TEXTONLY3%`.
## Users next on duty
[Section titled “Users next on duty”](#users-next-on-duty)
| Token | Description |
| ---------------------------- | -------------------------------------------------------------------- |
| `%NEXT_USER%` | The real name of the user who will be on duty after the current one. |
| `%NEXT_USERHANDLE%` | The handle of the next user on duty as a clickable Slack mention. |
| `%NEXT_USERHANDLE_TEXTONLY%` | The handle of the next user on duty as plain text. |
| `%NEXT_USERID%` | The Slack ID of the next user on duty. |
## Rotation events
[Section titled “Rotation events”](#rotation-events)
| Token | Description |
| ------------------ | ----------------------------------------------------------------------------------------------------------------------------------------------------------------------- |
| `%UNTIL%` | When the current duty ends, in the rotation’s local time (for example “Monday, 24 April 2023 14:00:00”). |
| `%UNTIL_UTC%` | When the current duty ends, in UTC (for example “Mon, 24 Apr 2023 12:00:00 GMT”). |
| `%NEXT_UNTIL%` | When the next duty ends, in the rotation’s local time. |
| `%NEXT_UNTIL_UTC%` | When the next duty ends, in UTC. |
| `%TIMEZONE%` | The rotation schedule’s timezone identifier (for example “Europe/Amsterdam”; see the [tz database list](https://en.wikipedia.org/wiki/List_of_tz_database_time_zones)). |
| `%TZ_OFFSET%` | The rotation schedule’s base offset from UTC, not counting daylight saving time (for example “+01:00” for Europe/Amsterdam). |
Note
Schedule tokens only produce values for rotations that follow a schedule (automatic or external rotations). For manual rotations they produce `N/A`.
## On-duty group
[Section titled “On-duty group”](#on-duty-group)
| Token | Description |
| ----------------------- | ------------------------------------------------------------------------------------------------------------------------------ |
| `%DUTYHANDLE%` | If the rotation uses an on-duty user group, the group’s handle (for example “@standup-operator”) as a clickable Slack mention. |
| `%DUTYHANDLE_TEXTONLY%` | If the rotation uses an on-duty user group, the group’s handle as plain text. |
## Acting user
[Section titled “Acting user”](#acting-user)
These tokens refer to the person performing a manual action, so they only have a value during manual actions. For example, if you (user Y) manually set user X on duty, the `ME` tokens point to you, not to user X.
| Token | Description |
| ---------------------- | ----------------------------------------------------------- |
| `%ME%` | The real name of the acting user. |
| `%MY_HANDLE%` | The handle of the acting user as a clickable Slack mention. |
| `%MY_HANDLE_TEXTONLY%` | The handle of the acting user as plain text. |
| `%MY_ID%` | The Slack ID of the acting user. |
## From Slack
[Section titled “From Slack”](#from-slack)
Template editing itself lives in the dashboard, but the results show up in Slack: your tokens are replaced in the messages Round Robin posts and in the channel topics it sets. In Slack’s create/edit rotation window you can turn topic management on and pick topic channels; until you write a custom topic template in the dashboard, the default topic applies.
# Topic management
> Keep Slack channel topics updated automatically with who is currently on duty.
Round Robin can announce your rotation status by setting the topic of one or more Slack channels. Whenever the on-duty person changes, the app rewrites the topic in the channels you selected, so anyone glancing at the channel knows who to ping.
## Enable topic management
[Section titled “Enable topic management”](#enable-topic-management)
1. Open your rotation in the [web dashboard](https://app.roundrobinbot.eu) and choose **Topic** from the **Configure** menu to reach its **Topic Configuration** page.
2. Turn on **Enable Topic Updates**, then save.
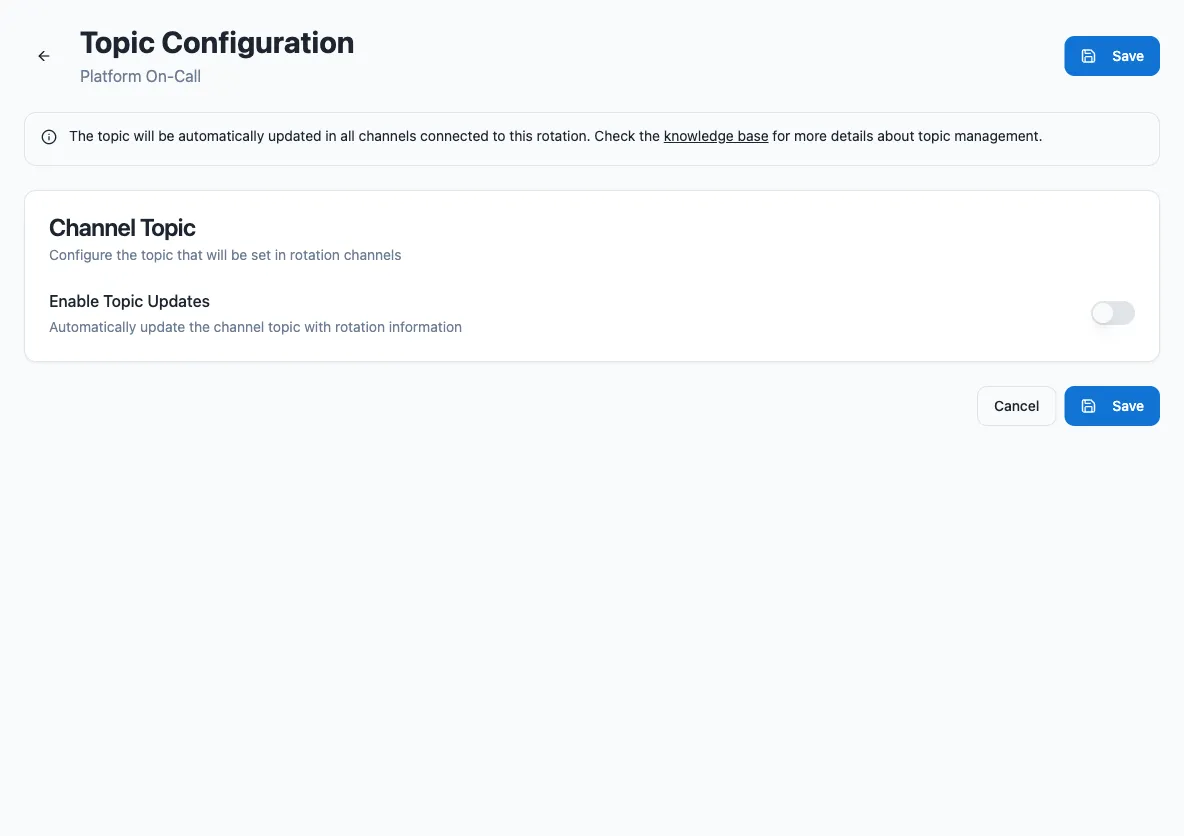
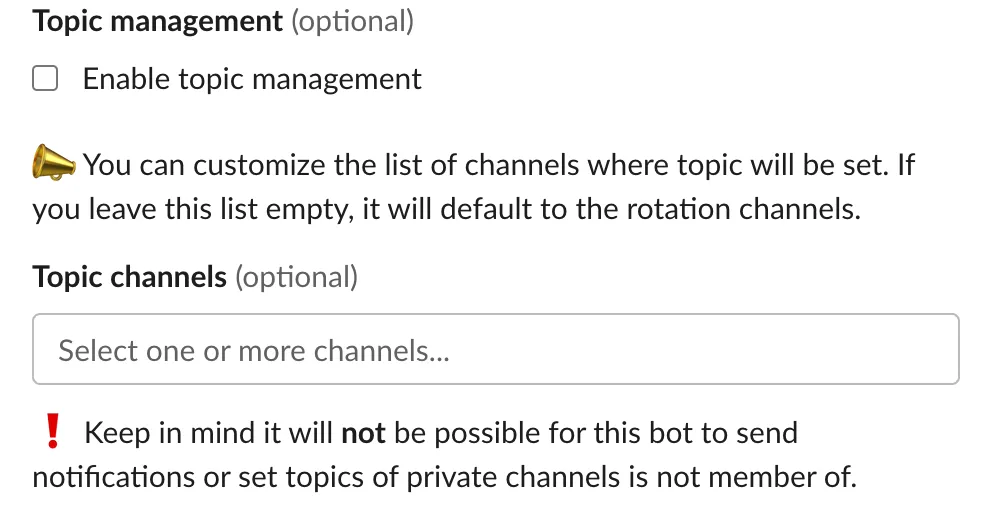
If you do not select any topic channels, the app uses the rotation’s message channels — this is the default.
Caution
The bot cannot set the topic of a private channel it is not a member of. Invite the bot to the channel first. If you do not see the topic options at all, your workspace’s installation of the app is missing the Slack permissions needed to manage topics; update or reinstall the app to grant them.
## Choose topic channels
[Section titled “Choose topic channels”](#choose-topic-channels)
The **Topic Configuration** page gives you fine-grained control over where the topic is set:
1. By default, the topic is set in all of the rotation’s message channels. Switch off any message channel where you don’t want the topic updated.
2. Add **topic-only channels**: channels that don’t receive rotation messages but should still get the topic.
3. A channel can be both a message channel and a topic channel.
## Default topic
[Section titled “Default topic”](#default-topic)
If you don’t provide a custom template, the app builds the topic for you:
> Round Robin says: @user is on duty for rotation *name*.
Two variations apply automatically:
* For automatic and external rotations (and for rotations with business-hours support enabled), the app appends the end of the current shift: “… on duty for rotation *name* until *date*.”
* If the rotation has an on-duty user group, the app appends: “You can also ask for help using @duty-group.”
If more than one person is on duty, the wording adjusts (“are on duty” instead of “is on duty”).
## Customize the topic template
[Section titled “Customize the topic template”](#customize-the-topic-template)
You can replace the default with your own template in the dashboard:
1. Open the rotation’s **Topic Configuration** page.
2. Type your template in the **Topic Template** field, using replacement tokens such as `%USER%`, `%USERHANDLE%`, `%NAME%`, and `%UNTIL%`. See [templating](/customizations/templating/) for the full token list.
3. Check the live preview below the field, then save.
Keep these limits in mind:
| Constraint | Detail |
| -------------- | -------------------------------------------------------- |
| Length | Templates are limited to 250 characters. |
| Formatting | Slack markdown is **not** supported in channel topics. |
| Empty template | Leave the field empty to fall back to the default topic. |
## Clearing the topic
[Section titled “Clearing the topic”](#clearing-the-topic)
If you disable topic management on a rotation, or delete a rotation that has it enabled, the app automatically clears the topics it set.
Note
The app only clears a topic it was the last to set. If someone edited the channel topic in the meantime, Round Robin leaves it alone to avoid overwriting their changes.
## From Slack
[Section titled “From Slack”](#from-slack)
You can also enable topic management without leaving Slack. Open the create/edit rotation window and check **Enable topic management**. Optionally, pick the channels where the topic should be set with the **Topic channels** selector — leave it empty to default to the rotation’s channels.
For per-channel toggles and custom topic templates, use the dashboard’s **Topic Configuration** page described above.
# Use an on-duty group
> Connect a Slack user group to a rotation so its members always match whoever is on duty.
An on-duty group is a Slack user group that Round Robin keeps in sync with your rotation: whenever duty changes, the group’s members are updated to the current on-duty users. Anyone can then mention a stable handle (for example `@support-operator`) without knowing who is on call right now. You can also reference the group in messages and topics with the `%DUTYHANDLE%` template token — see [Templating](/customizations/templating/).
## Prerequisites
[Section titled “Prerequisites”](#prerequisites)
The feature depends on Slack user groups, so it requires:
* A Slack plan where [user groups are available](https://slack.com/help/articles/212906697-Create-a-user-group).
* [Workspace permissions](https://slack.com/help/articles/115004952926-Manage-permissions-for-user-groups) that let the app work with user groups.
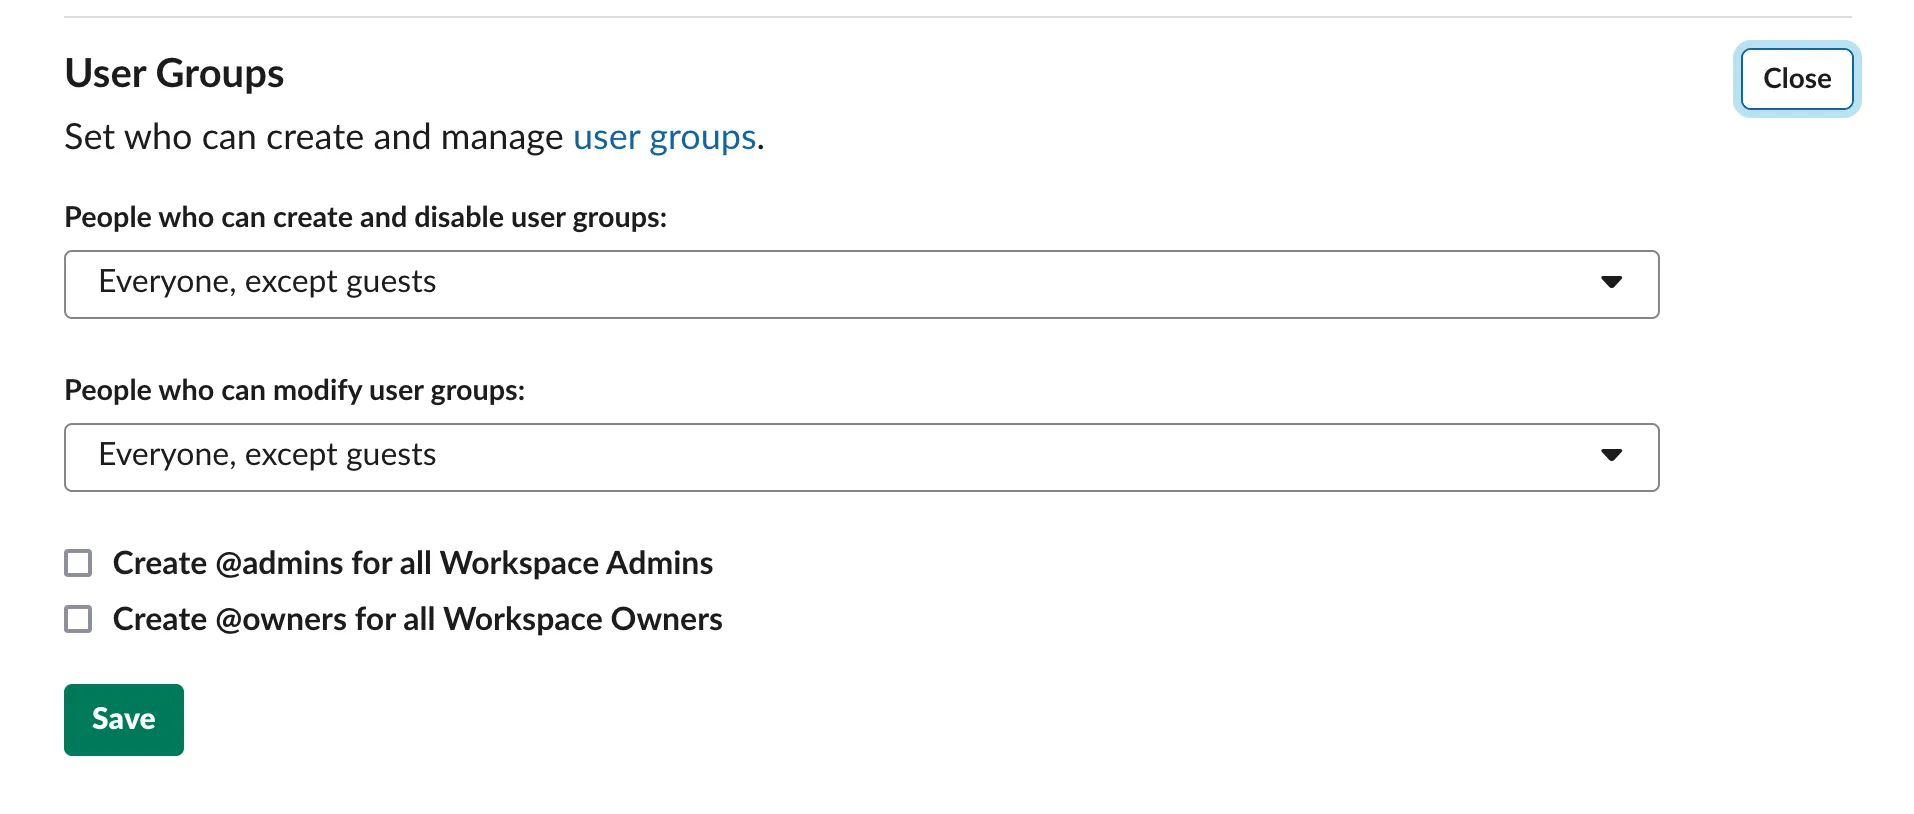
If you are a workspace admin, open **Workspace Settings & Permissions** and set both user group permissions (“create and disable” and “modify”) to **Everyone, except guests**.
If you cannot change these settings yourself, ask an administrator. At minimum the app needs permission to **modify** user groups; in that case someone with create permission must create the group first, and you connect it as an existing group.
## Connect a group from the dashboard
[Section titled “Connect a group from the dashboard”](#connect-a-group-from-the-dashboard)
1. Sign in at [app.roundrobinbot.eu](https://app.roundrobinbot.eu) and open your rotation.
2. Open the **Configure** menu and choose **On-duty Group**.

3. On the On-duty group page, create a managed group or link an existing one. If the app can create user groups in your workspace, accept the proposed handle (*rotation-name*-operator) or type your own. Handles must be lowercase with no spaces, and the usual Slack user group naming limits apply.
4. If the app cannot create groups, pick an existing group instead; you get an error on save if the app cannot edit that group either.
Once connected, the page shows the linked group and whether it is managed by Round Robin.

Note
An on-duty group is optional — a rotation works fine without one.
## How membership is synced
[Section titled “How membership is synced”](#how-membership-is-synced)
On every duty change, Round Robin updates the group so it contains the current on-duty users (all of them, if more than one user is on duty at a time). Users that cannot be members of a Slack user group — deactivated accounts, bots, and guest users — are skipped automatically.
Two team-wide settings control the details, under **Team Settings** in the dashboard:
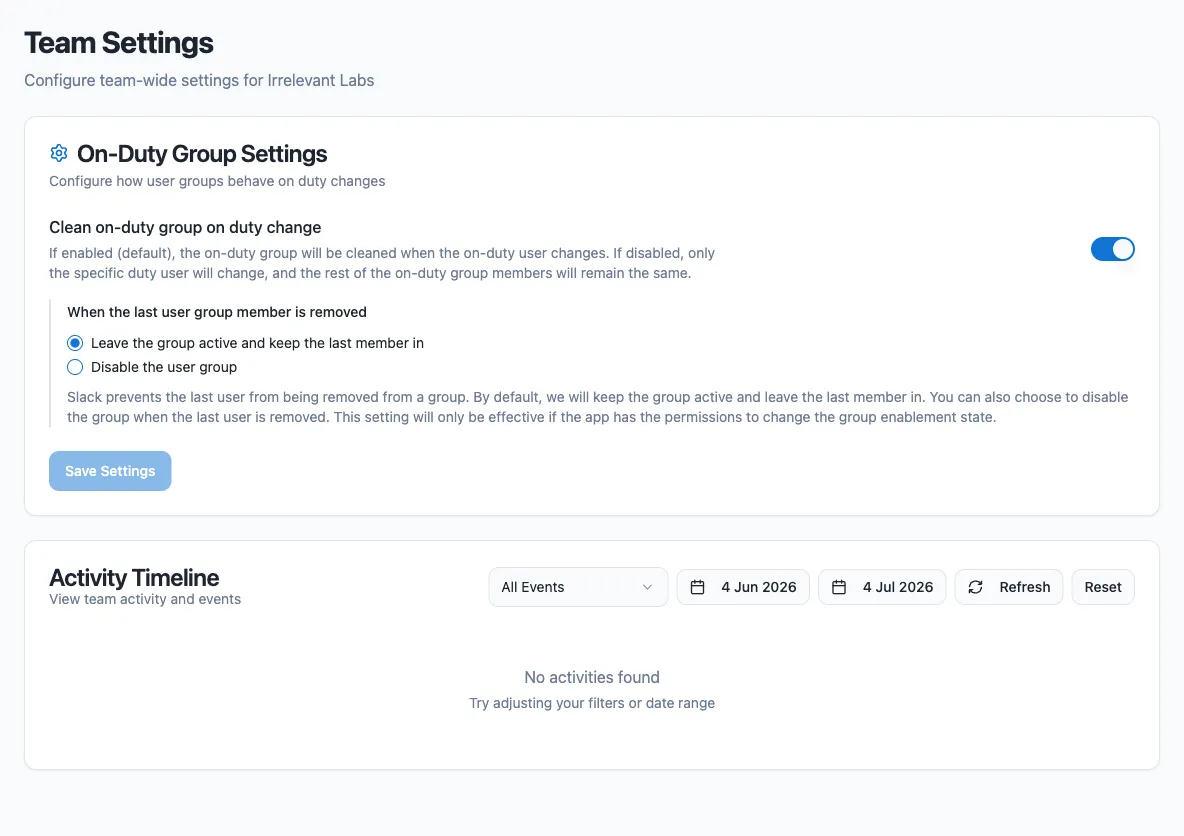
| Setting | Behavior |
| ---------------------------------------------------- | ----------------------------------------------------------------------------------------------------------------------------------------------------------------------------------- |
| **Clean on-duty group on duty change** (default: on) | The group’s membership is replaced with the new on-duty users. Turn it off to have the bot only add and remove the users going on and off duty, leaving any other members in place. |
| **When the last user group member is removed** | Slack requires a user group to have at least one member. Choose what happens when everyone goes off duty (for example with business-hours rotations): see below. |
For the last-member setting:
* **Leave the group active and keep the last member in** (default): the last on-duty user stays in the group and is removed as soon as someone else goes on duty.
* **Disable the user group**: the app disables the group and re-enables it when the next user goes on duty. This requires permission to disable user groups.
Caution
If the app loses access to the group — it can no longer read it, re-enable it, or update its members — it disconnects the group from the rotation rather than leaving it out of sync. If someone deletes the group in Slack, the app first tries to restore (re-enable) it, and only disconnects it if that fails.
## From Slack
[Section titled “From Slack”](#from-slack)
You can also connect a group without leaving Slack:
1. Show your rotation with `/roundrobin`.
2. Open **Other actions…** in the rotation command bar and choose **Add on-duty group**.
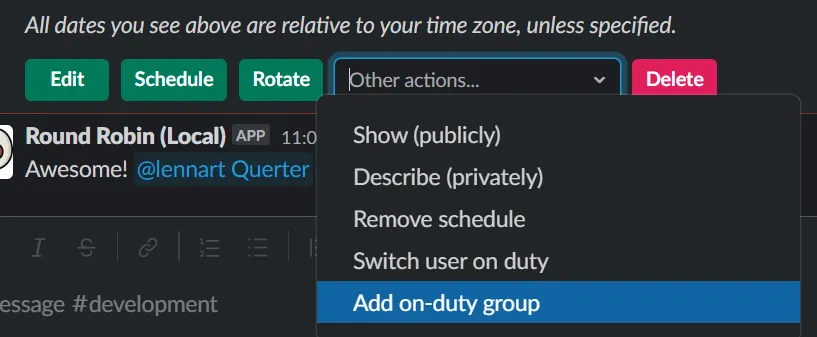
3. Accept the proposed handle or type your own. If the app cannot create groups, the modal shows a picker of existing groups instead.

## Disabling the rotation
[Section titled “Disabling the rotation”](#disabling-the-rotation)
Turning off a rotation removes its on-duty group connection, and it is not restored when you re-enable the rotation. Reconnect the group manually afterward.
## Removing the group
[Section titled “Removing the group”](#removing-the-group)
Use **Remove** on the rotation’s On-duty group page in the dashboard, or **Remove on-duty group** from the rotation command bar in Slack. If Round Robin created the group, it is disabled in Slack; if you linked an existing group, syncing stops and the group itself is left untouched.
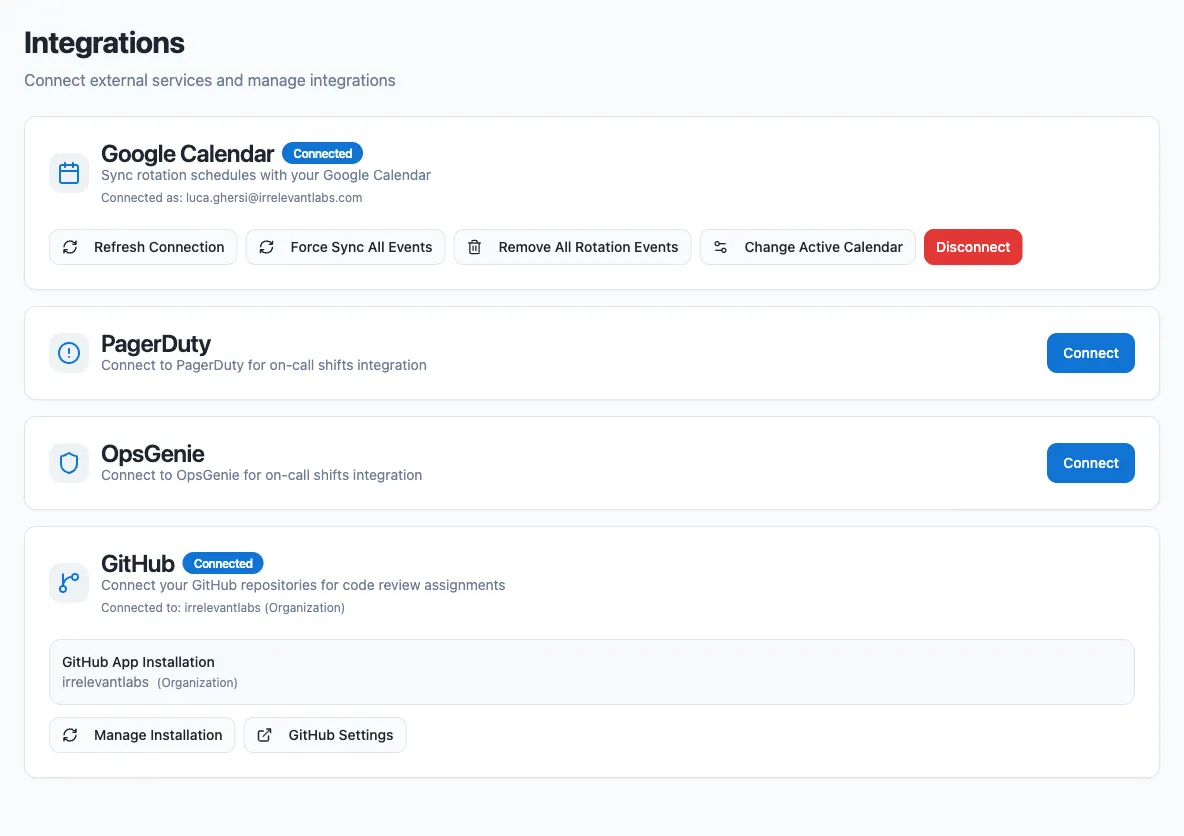
# GitHub integration
> Connect GitHub repositories to a rotation and notify on-duty users or rotation channels about pull requests, reviews, and issues.
Connect your GitHub repositories to Round Robin and route notifications about pull requests, reviews, and issues to the people currently on duty, to the rotation’s Slack channels, or both.
Note
The GitHub integration requires a paid plan. If your team downgrades to the free plan, the GitHub connection is disabled automatically.
## Install the GitHub App
[Section titled “Install the GitHub App”](#install-the-github-app)
1. In the [dashboard](https://app.roundrobinbot.eu), go to **Settings** → **Integrations**.
2. In the GitHub section, click **Install GitHub App**. You are redirected to GitHub.
3. Choose the organization or personal account to install the app on.
4. Grant access to all repositories or select specific ones.
5. Complete the installation. You are redirected back to the dashboard, and the connected GitHub account appears on the integrations page.
Private repositories work as long as the GitHub App has access to them.
## Configure a rotation
[Section titled “Configure a rotation”](#configure-a-rotation)
Once GitHub is connected, each rotation can have its own GitHub configuration:
1. Open the rotation’s detail page and open the **⋯** menu.
2. Click **GitHub Integration**.
3. Choose your repositories, notification target, and events (see below).
4. Click **Save**.
Multiple rotations can watch the same repository, each with its own event selection and templates.
### Repositories
[Section titled “Repositories”](#repositories)
* **All Repositories** — the rotation is connected to every repository the GitHub App can access. Repositories added to the installation later are included automatically.
* **Select Specific Repositories** — choose individual repositories from the list.
### Notification target
[Section titled “Notification target”](#notification-target)
| Option | Behavior |
| --------------------- | --------------------------------------------- |
| On-Duty User Only | Direct message to the users currently on duty |
| Channel Only | Post to the rotation’s Slack channels |
| Both User and Channel | Both of the above |
If the target resolves to nobody (for example, “On-Duty User Only” with no one on duty), no notification is sent.
### Events
[Section titled “Events”](#events)
Pick **Default Events** or switch to **Custom Event Selection** to choose from:
| Event type | Covers | In default set |
| ----------------------------- | --------------------------------------------------------------------------------------------------------- | -------------- |
| `pull_request` | PR opened, closed, merged, reopened, new commits, ready for review, converted to draft, labeled/unlabeled | Yes |
| `pull_request_review` | Review submitted, dismissed, or edited | Yes |
| `pull_request_review_comment` | Comment on a PR diff | Yes |
| `pull_request_review_thread` | Review thread resolved or unresolved | Yes |
| `issue_comment` | Comment on an issue or PR | Yes |
| `issues` | Issue opened, closed, reopened, assigned/unassigned, labeled/unlabeled | Yes |
## Custom notification templates
[Section titled “Custom notification templates”](#custom-notification-templates)
Every event type ships with a built-in message, but you can override it per event type or per specific action. When an event arrives, Round Robin picks the first template that matches:
1. **Action-specific template** — key like `pull_request:merged`
2. **Event-type template** — key like `pull_request`
3. **Default template** — built-in message
For example, set a celebration message for `pull_request:merged` while all other PR actions use your general `pull_request` template.
Tip
A PR that is closed by merging is reported with the action `merged`, not `closed`. Comments on PRs and issues are distinguished with actions like `created_on_pr` and `created_on_issue`.
### Placeholders
[Section titled “Placeholders”](#placeholders)
| Placeholder | Description |
| ---------------------------- | -------------------------------------------------------------------- |
| `%ROTATION_NAME%` | Name of the rotation |
| `%GITHUB_ACTOR%` | GitHub user who triggered the event |
| `%GITHUB_REPOSITORY%` | Full repository name (`owner/repo`) |
| `%GITHUB_REPOSITORY_SHORT%` | Repository name without the owner |
| `%GITHUB_EVENT_TITLE%` | Title of the PR or issue |
| `%GITHUB_EVENT_URL%` | Link to the PR, issue, or comment |
| `%GITHUB_EVENT_DESCRIPTION%` | Body text, truncated to 150 characters and rendered as a Slack quote |
| `%GITHUB_EVENT_TYPE%` | Event type, e.g. `pull_request` |
| `%GITHUB_ACTION%` | Specific action, e.g. `opened`, `merged` |
| `%GITHUB_LABEL%` | Label name (only for labeled/unlabeled actions) |
Example template for `pull_request:merged`:
```plaintext
🎉 *PR merged!* %GITHUB_EVENT_TITLE% — great work, %GITHUB_ACTOR%! Shipped in `%GITHUB_REPOSITORY_SHORT%`
```
## Troubleshooting
[Section titled “Troubleshooting”](#troubleshooting)
**Notifications are not arriving**
1. Check **Settings** → **Integrations** and verify the GitHub connection is active.
2. Verify the GitHub App has access to the repository in question.
3. In the rotation’s GitHub configuration, confirm the event type is enabled and the repository is included.
4. If the target is “On-Duty User Only”, confirm someone is currently on duty.
**Wrong message template is used**
Templates apply in order of specificity: an action-specific template such as `pull_request:merged` always wins over the general `pull_request` template.
**GitHub shows as disconnected**
This happens when the app is uninstalled from GitHub or the installation is suspended. If the installation was suspended, unsuspending it on GitHub reactivates the connection automatically; if the app was uninstalled, reinstall the GitHub App from the integrations page.
# Google Calendar sync
> Connect your Google Calendar to see your duties as calendar events and let Round Robin skip you when you are out of office.
Connecting Round Robin to Google Calendar syncs in both directions:
* **Export:** Round Robin creates an event in your calendar for each of your on-duty periods, so you can see your shifts alongside the rest of your schedule.
* **Import:** Round Robin reads out-of-office events from your calendar and can automatically skip you when a rotation would put you on duty while you are away.
Note
Google Calendar sync requires a paid (Pro) plan. The connection is personal: each rotation member connects their own Google account, and events are created in their own calendar.
## Connect your Google account
[Section titled “Connect your Google account”](#connect-your-google-account)
1. Open the dashboard at [app.roundrobinbot.eu](https://app.roundrobinbot.eu).
2. Go to **Settings → Integrations**.
3. On the **Google Calendar** card, click **Sign in with Google** and complete the Google consent flow.
Once connected, the card shows a **Connected** badge and the Google email address in use. Syncing is automatic from this point on.
If the badge changes to **Needs Reconnection**, click **Reconnect** to run the Google sign-in again and refresh the stored token.
## What Round Robin writes to your calendar
[Section titled “What Round Robin writes to your calendar”](#what-round-robin-writes-to-your-calendar)
For every rotation where you are on duty, Round Robin creates an event named `Duty: ` in your **events calendar**, covering your on-duty period, with a link back to the rotation in the dashboard. When the duty changes, old events are removed and new ones are created.
## How out-of-office import works
[Section titled “How out-of-office import works”](#how-out-of-office-import-works)
Round Robin monitors your **out-of-office calendar** and stores your OOO periods. Whether they affect duty assignment is controlled per rotation:
1. Open the rotation in the dashboard and go to its **Options** page.
2. In the **External Calendars** card, set **Out-of-Office Time Consideration**.
| Setting | Behavior |
| ------------------------------ | ------------------------------------------------------------------------------------------------------------ |
| Never | Out-of-office time is ignored. |
| Always | Any out-of-office event that overlaps the duty period makes Round Robin skip you. |
| Only if OOO time is more than… | You are skipped only when the out-of-office event lasts at least the configured number of consecutive hours. |
## Choose which calendars to use
[Section titled “Choose which calendars to use”](#choose-which-calendars-to-use)
By default, Round Robin uses your primary calendar (the one matching your Google email address) for both events and out-of-office data. To change this:
1. On the Google Calendar card, click **Change Active Calendar**.
2. Pick an **Events Calendar** (where duty events are created).
3. Pick an **Out-of-Office Calendar** (which calendar is monitored for OOO).
4. Optionally add **Out-of-Office Keywords**, then click **Save Changes**.
Keywords filter which events count as out-of-office: if you add any, only events whose title contains one of the keywords (case-insensitive) are considered. With no keywords, every eligible event counts.
Caution
Shared Google calendars do not support native out-of-office events — this is a Google limitation. If you select a shared calendar (any calendar other than your primary one) as your out-of-office calendar, Round Robin treats its *regular* events as out-of-office instead. Use keywords (for example, “vacation”) to limit which events count. Only events where you or the selected calendar are the organizer or an attendee are considered.
## Manage the connection
[Section titled “Manage the connection”](#manage-the-connection)
Once connected, the Google Calendar card offers these actions:
| Action | What it does |
| -------------------------- | ------------------------------------------------------------------------------------------------------------------------------------------------------------------------ |
| Refresh Connection | Runs the Google sign-in flow again to renew the stored token. |
| Force Sync All Events | Clears and recreates all Round Robin events, and re-imports out-of-office data. |
| Remove All Rotation Events | Deletes all Round Robin duty events from your calendar without recreating them; they are recreated the next time your duties sync (or if you run Force Sync All Events). |
| Change Active Calendar | Opens the calendar and keyword settings described above. |
| Disconnect | Disables the integration; duty events stop syncing until you reconnect. |
# Integrate OpsGenie with Round Robin
> Connect Round Robin to OpsGenie with an API key so rotations can follow your OpsGenie schedules.
Connecting OpsGenie lets Round Robin read your OpsGenie schedules, so you can create rotations whose members and on-duty user come straight from OpsGenie. You set up and manage the connection on the [Round Robin dashboard](https://app.roundrobinbot.eu), under **Settings** > **Integrations**. The connection uses an OpsGenie API key — there is no OAuth flow.

Note
Integrations are available on paid plans only. On the Free plan, the Integrations page is locked.
## Before you start: create an API key in OpsGenie
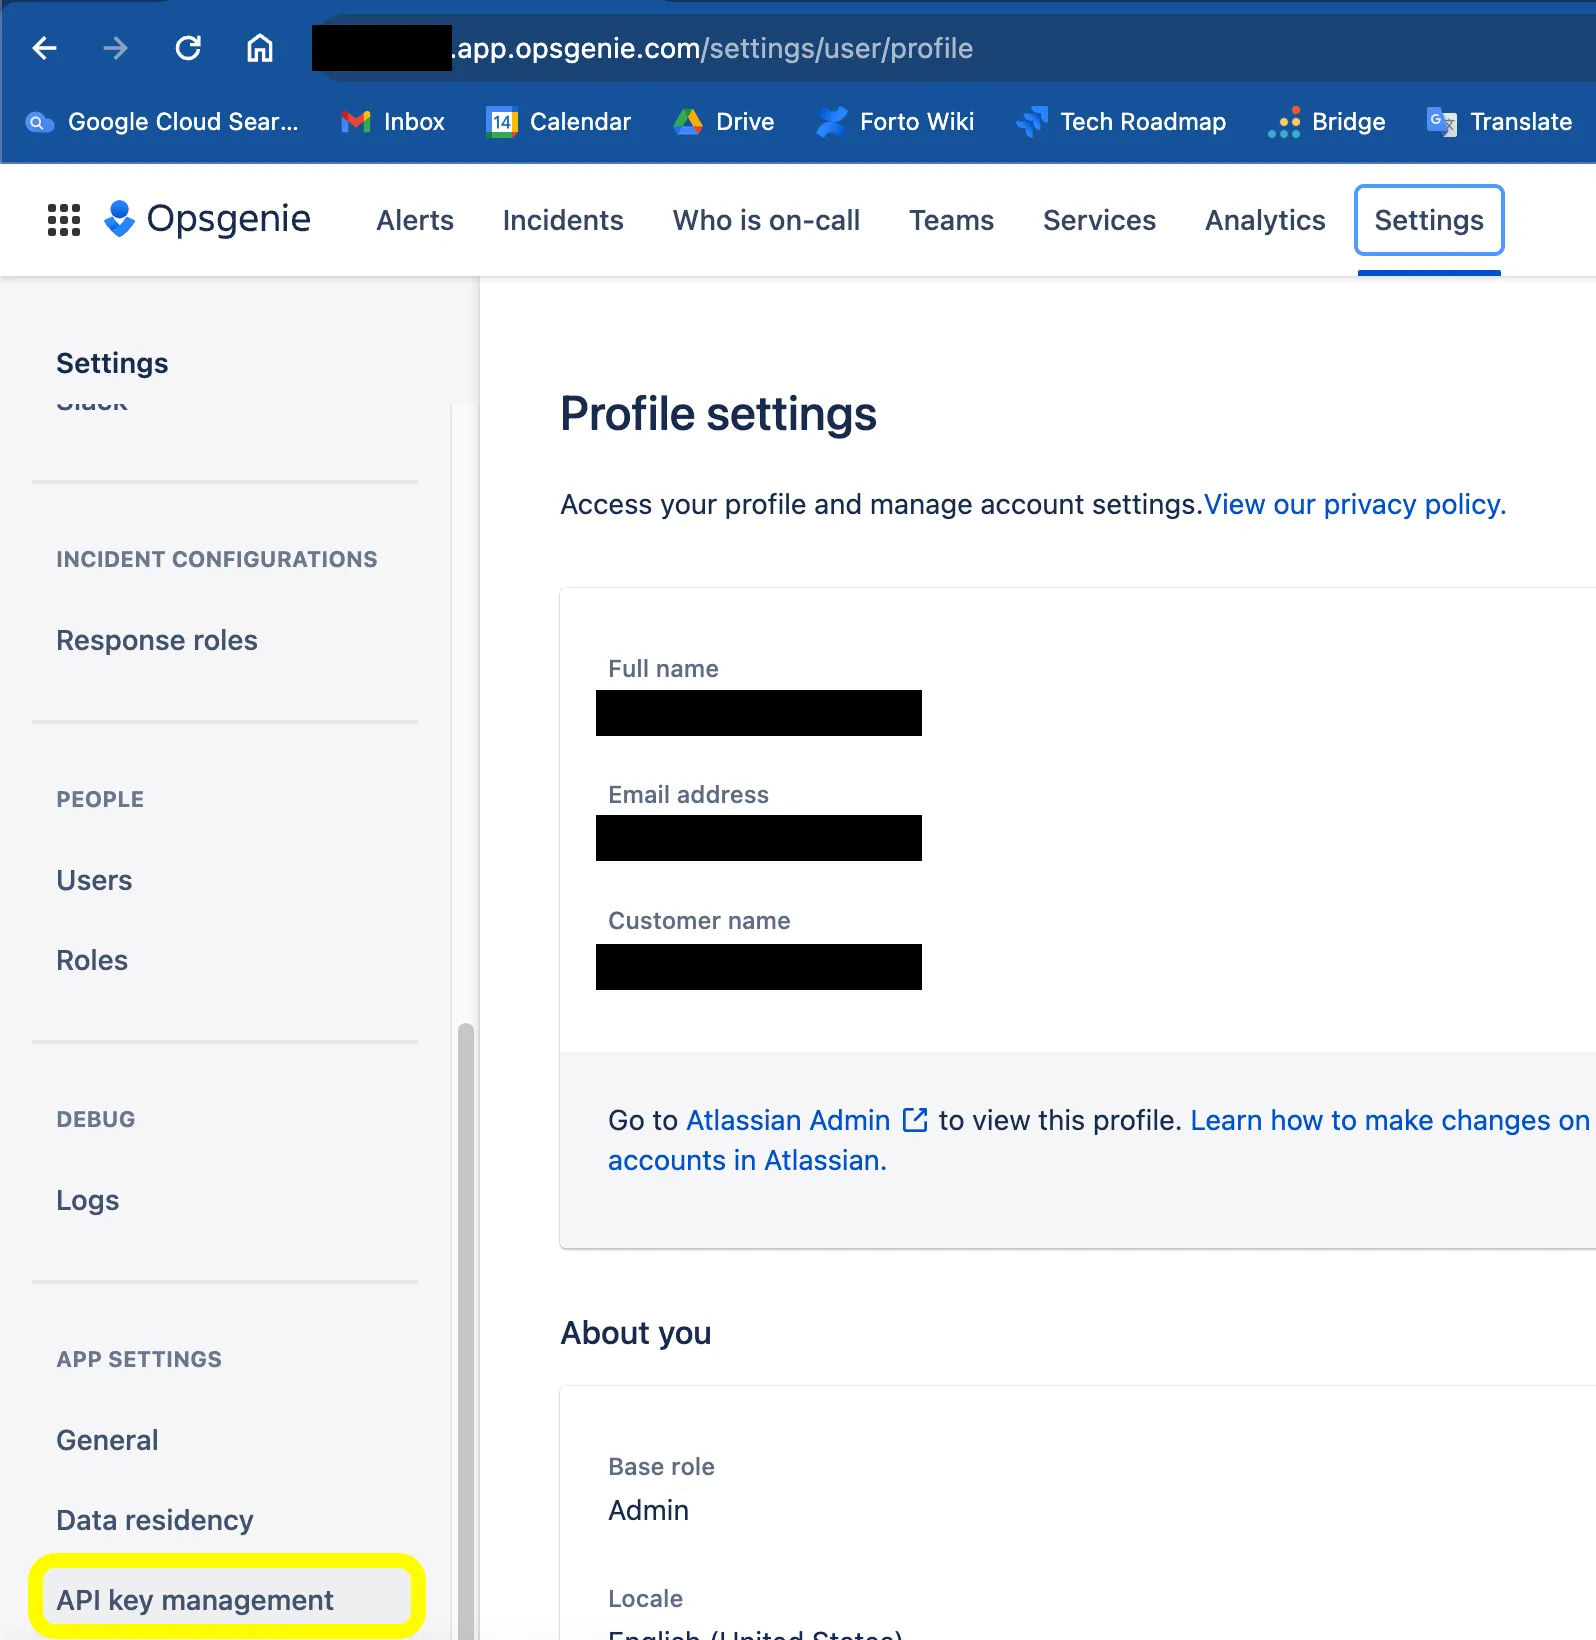
[Section titled “Before you start: create an API key in OpsGenie”](#before-you-start-create-an-api-key-in-opsgenie)
1. Open OpsGenie and go to **Settings** > **API key management**.
2. Click **Add new API key**.
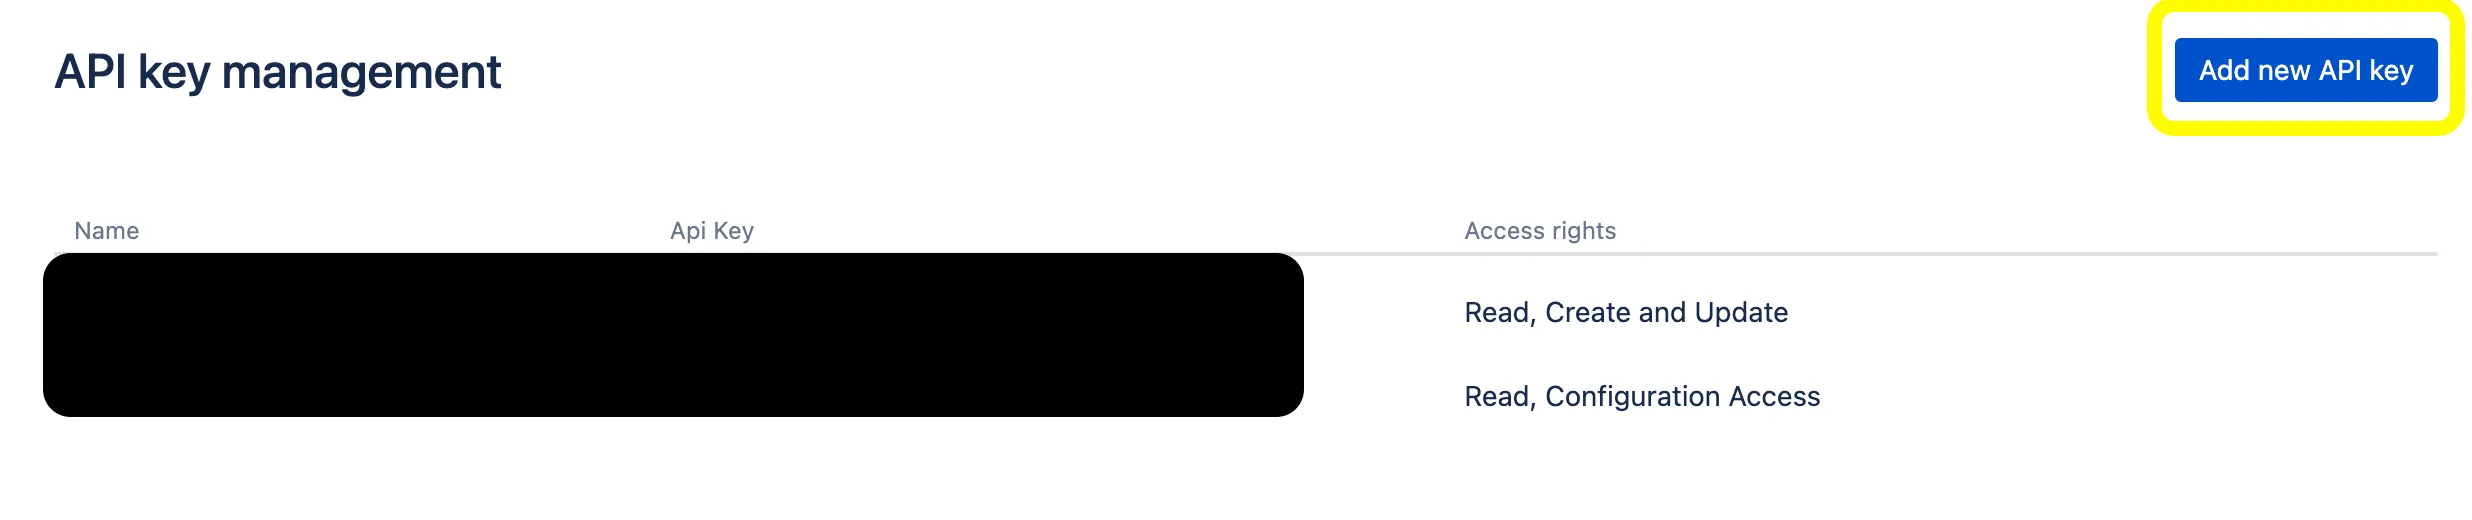
3. Grant the key the **Read** and **Configuration access** rights, then save it.
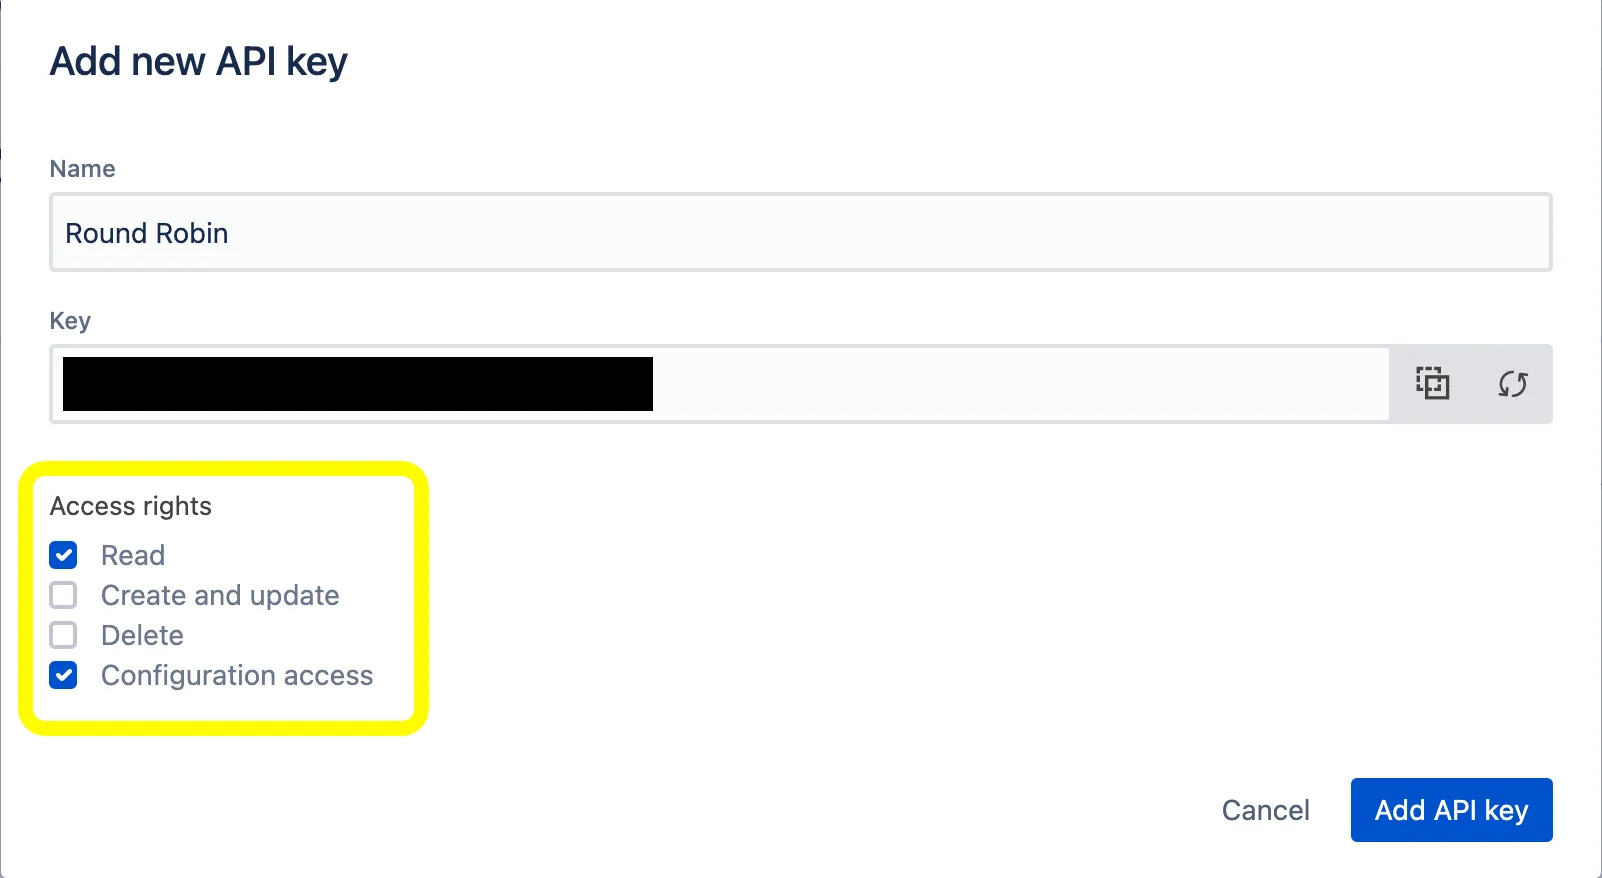
4. Copy the API key — you will paste it into Round Robin in the next section.
## Connect Round Robin to OpsGenie
[Section titled “Connect Round Robin to OpsGenie”](#connect-round-robin-to-opsgenie)
1. Open the [Round Robin dashboard](https://app.roundrobinbot.eu) and go to **Settings** > **Integrations**.
2. On the **OpsGenie** card, click **Connect**.
3. In the **Connect to OpsGenie** dialog, paste your API key. If your OpsGenie account is hosted on the EU instance, check **European Data Residency (EU instance)** — Round Robin will call `api.eu.opsgenie.com` instead of `api.opsgenie.com`.
4. Click **Connect with API Key**.
Once connected, the OpsGenie card shows a **Connected** badge and the last digits of the stored API key. From here you can also **Edit API Key** to rotate the key without disconnecting.
With the connection in place, you can bind rotations to OpsGenie schedules. See [PagerDuty or OpsGenie based rotations](/integrations/pagerduty-based-rotations/).
## Disconnect OpsGenie
[Section titled “Disconnect OpsGenie”](#disconnect-opsgenie)
1. Go to **Settings** > **Integrations** in the [Round Robin dashboard](https://app.roundrobinbot.eu).
2. On the OpsGenie card, click **Disconnect** and confirm.
Caution
Disconnecting unbinds every rotation that is linked to an OpsGenie schedule. Those rotations switch to manual mode, and each rotation’s owners receive a Slack message telling them the rotation is no longer bound to OpsGenie.
# Integrate PagerDuty with Round Robin
> Connect Round Robin to PagerDuty with an API key or OAuth so rotations can follow your PagerDuty schedules.
Connecting PagerDuty lets Round Robin read your PagerDuty schedules, so rotations can follow them automatically. Once connected, you can bind individual rotations to a PagerDuty schedule — see [PagerDuty-based rotations](/integrations/pagerduty-based-rotations/).
You can connect in two ways:
| Method | Pros | Trade-offs |
| --------- | ------------------------------------------------------- | -------------------------------------------------------------------------------------------------------------------------------------------------------------------------------------- |
| API key | Simpler and faster to set up; a read-only key is enough | You manage a static credential |
| OAuth 2.0 | Short-lived tokens, refreshed automatically | Requires creating an OAuth app in PagerDuty; the connection acts as the PagerDuty user who authorizes it, so that user must be able to see all the schedules and users you want to use |
Note
Integrations are available on paid plans, and the connection is managed per Slack workspace.
## Where to connect
[Section titled “Where to connect”](#where-to-connect)
Everything happens in the [Round Robin dashboard](https://app.roundrobinbot.eu): open **Settings → Integrations** to find the PagerDuty card alongside the other providers.

## Connect with an API key
[Section titled “Connect with an API key”](#connect-with-an-api-key)
1. In the dashboard, go to **Settings → Integrations** and click **Connect** on the PagerDuty card.
2. In PagerDuty, create an API key from the **Integrations** menu. A **read-only** key is sufficient — Round Robin only reads schedules and users.
3. Back in the connect dialog, paste the API key and click **Connect with API Key**.
The PagerDuty card now shows the connection as active, with the last digits of your key. Use **Edit API Key** on the same card whenever you need to rotate the key.
## Connect with OAuth 2.0
[Section titled “Connect with OAuth 2.0”](#connect-with-oauth-20)
With OAuth, you first register an app in PagerDuty, then hand its credentials to Round Robin, which redirects you to PagerDuty to authorize the connection.
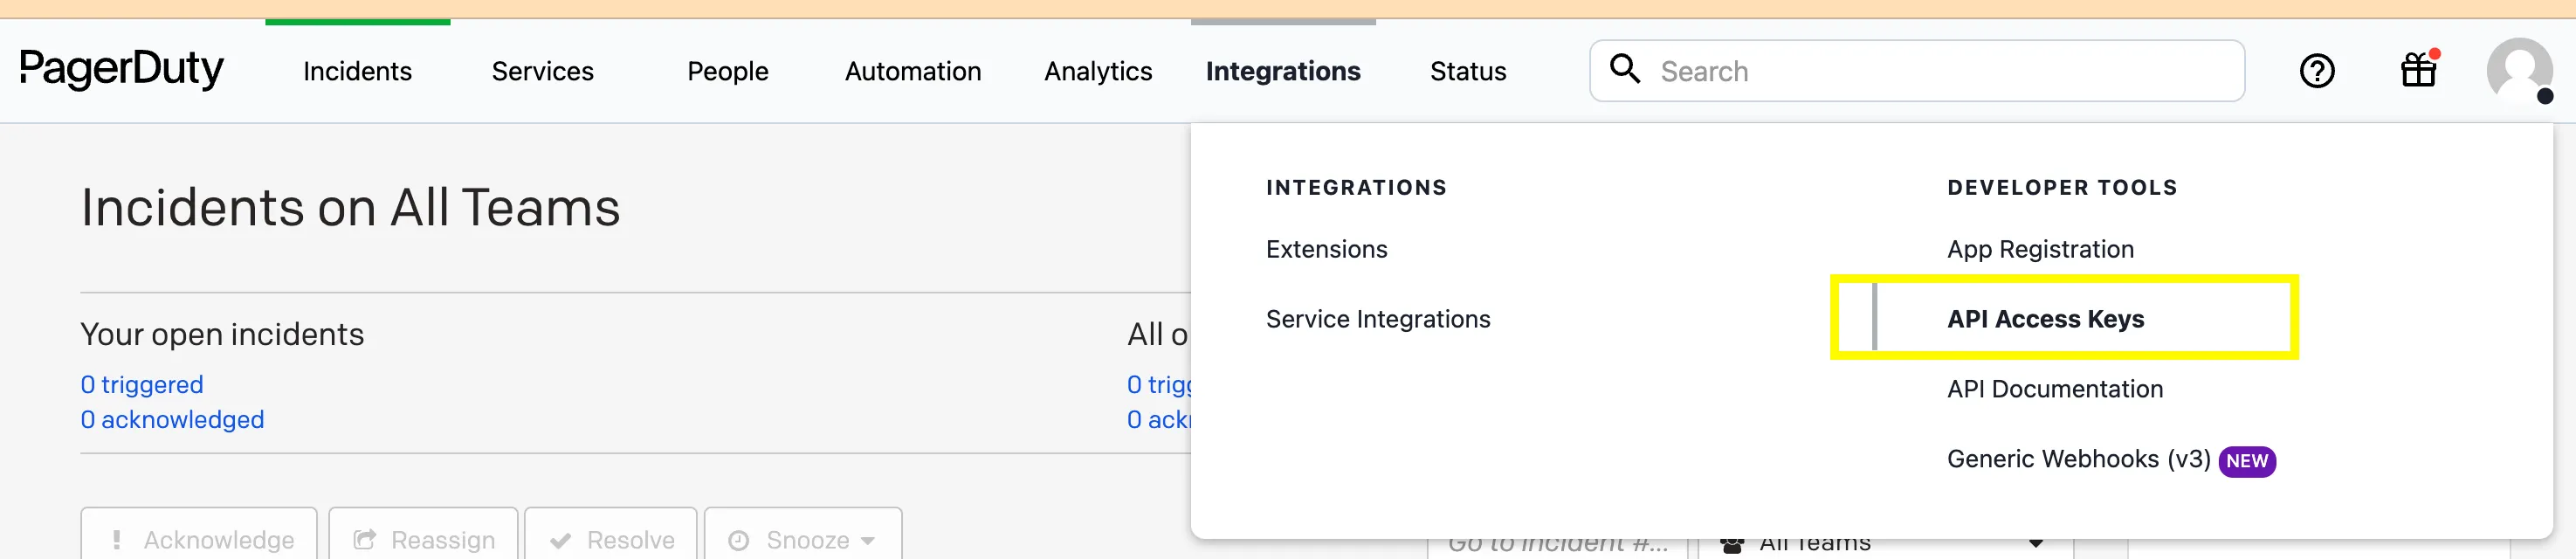
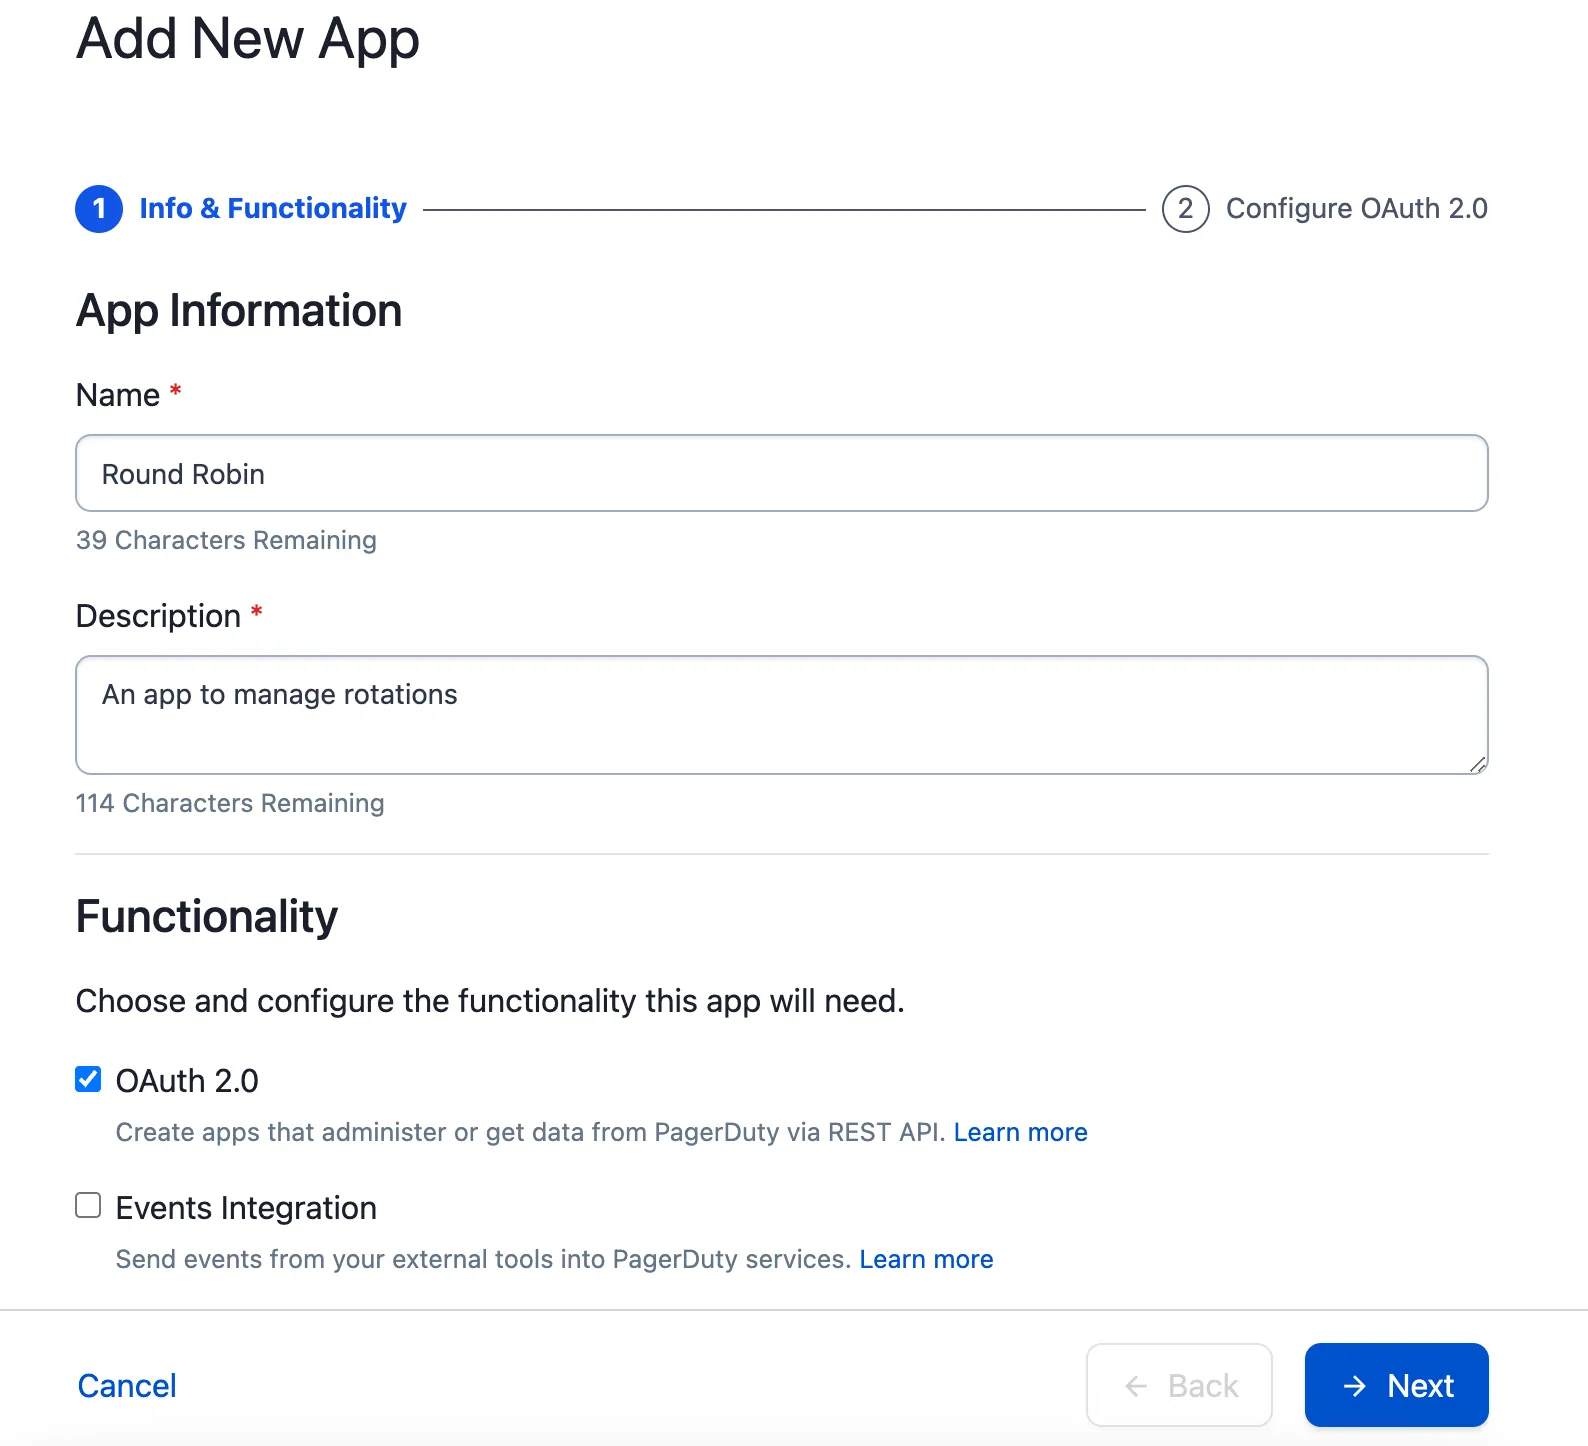
1. In PagerDuty, open the **Integrations** menu and choose **App Registration**.

2. Create a new app and enable **OAuth 2.0** functionality.
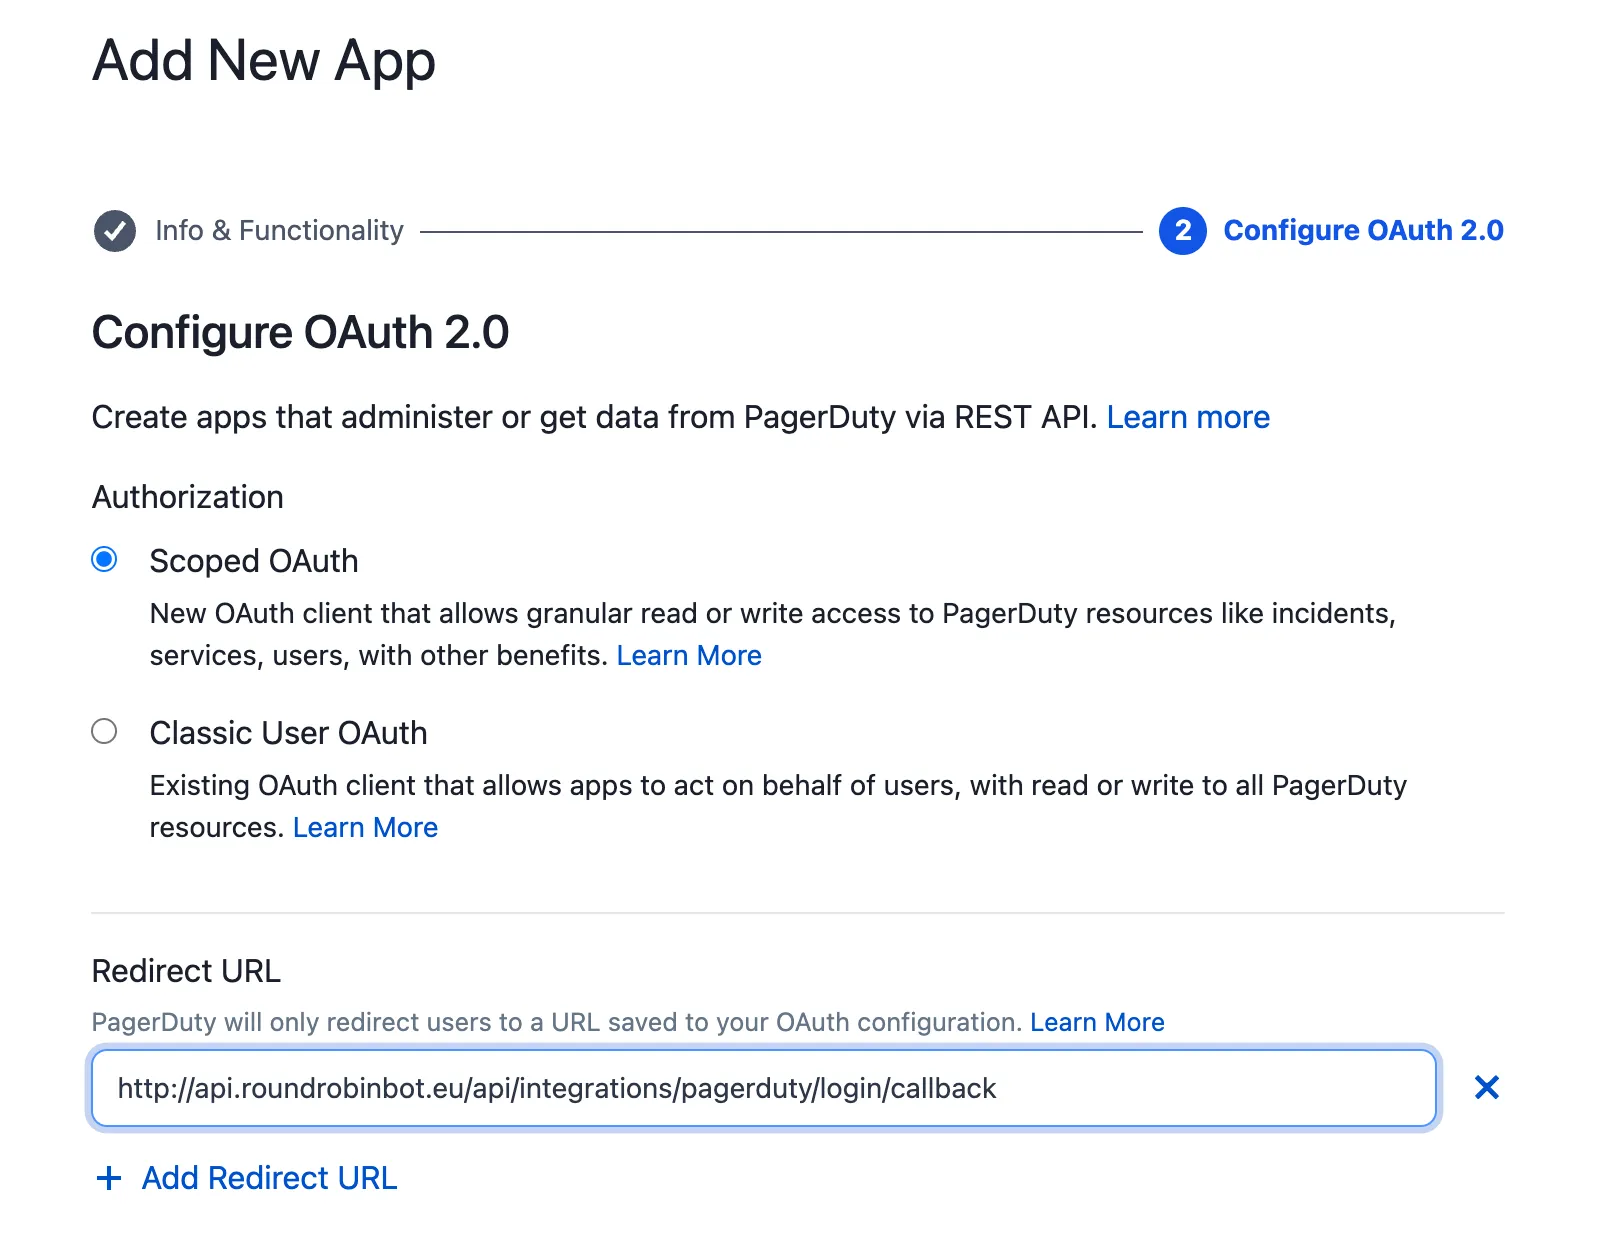
3. Choose **Scoped OAuth** and add this redirect URL:
`https://api.roundrobinbot.eu/api/integrations/pagerduty/login/callback`
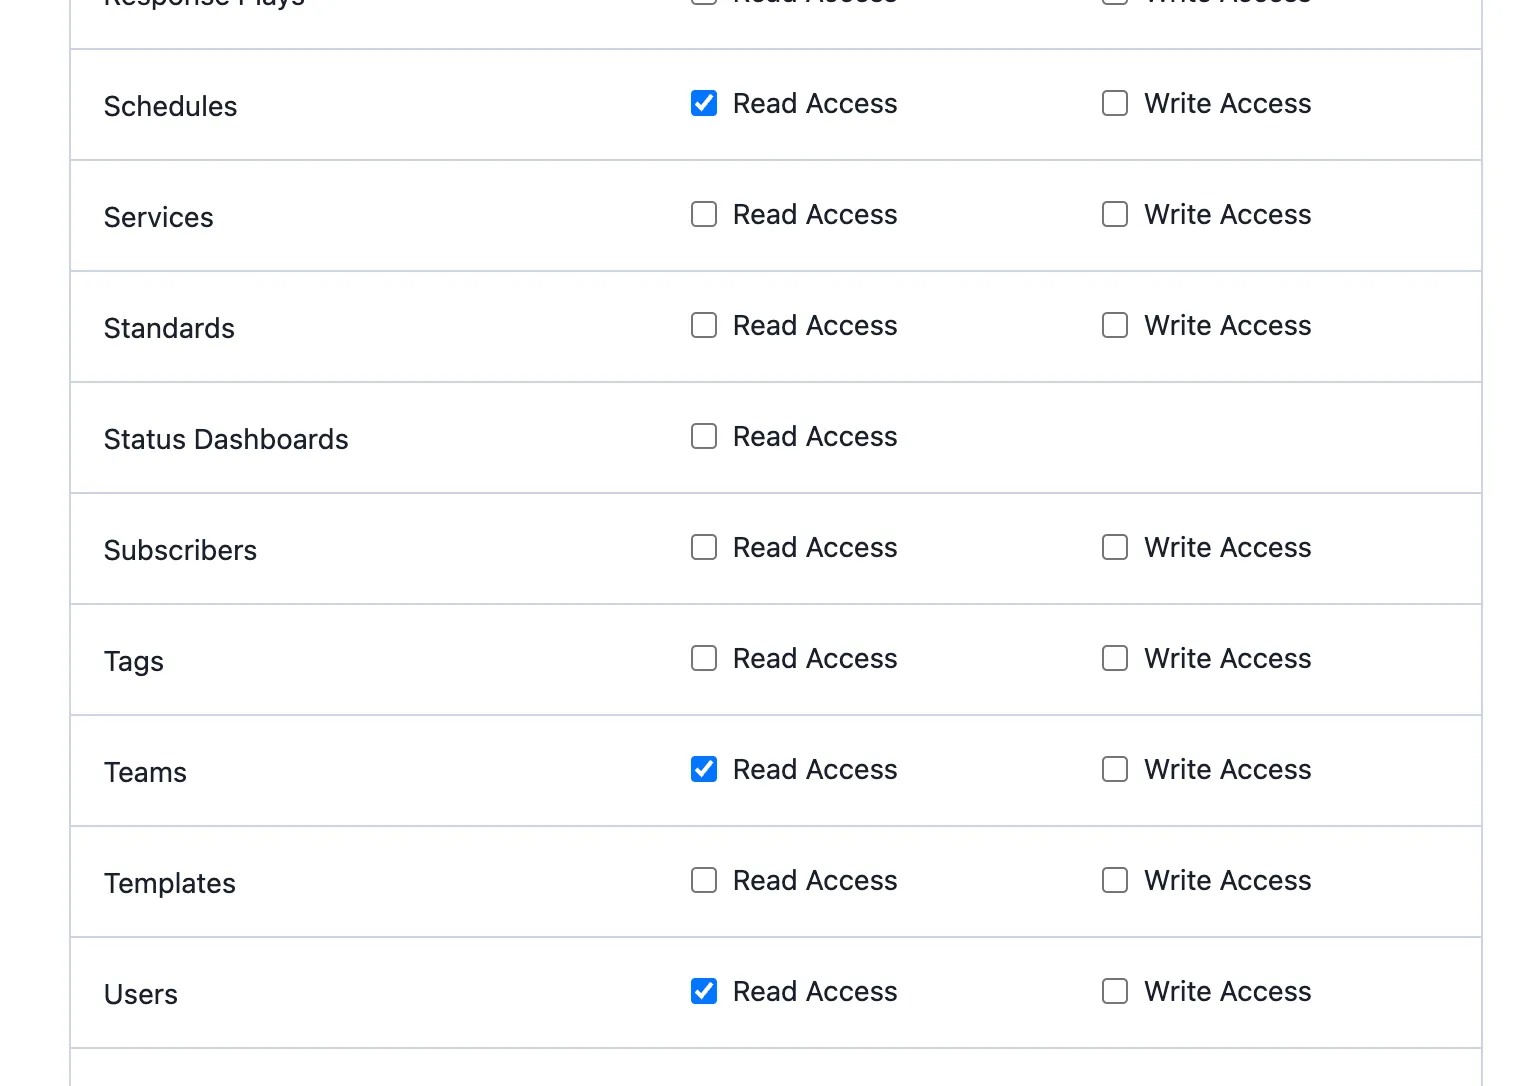
4. Grant read access to **Schedules**, **Teams**, and **Users**. Round Robin requests the `openid`, `schedules.read`, `teams.read`, and `users.read` scopes.
The final configuration should look like this:

5. Click **Register App**. PagerDuty shows a **Client ID** and a **Client Secret** — copy both.
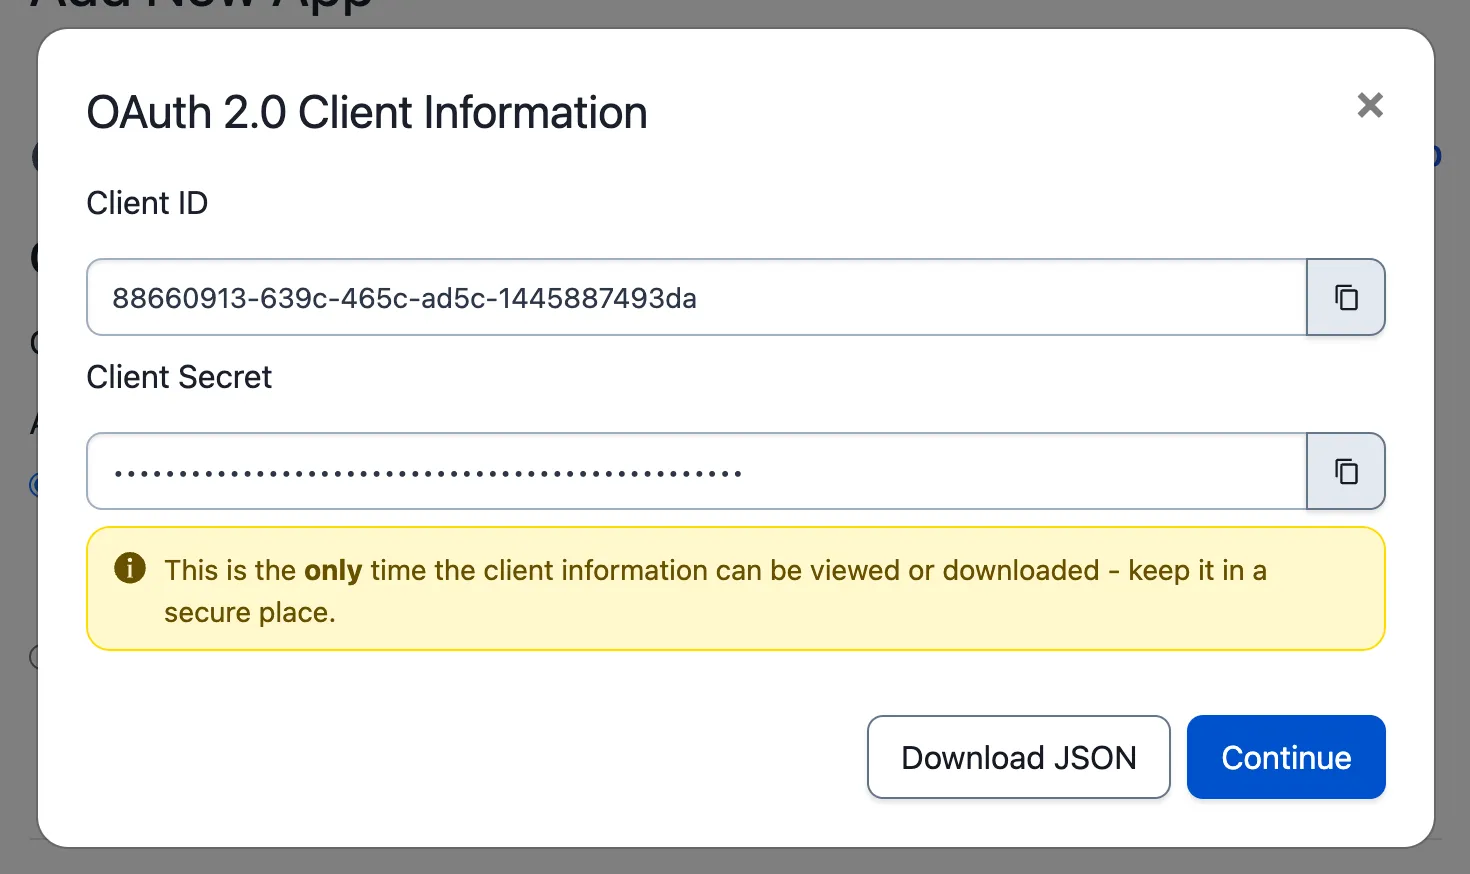
6. Open the [Round Robin dashboard](https://app.roundrobinbot.eu), go to **Settings → Integrations**, and click **Connect** on the PagerDuty card.
7. Enter the Client ID and Client Secret in the OAuth section of the dialog and click **Connect with OAuth**.
8. You are redirected to PagerDuty to authorize the connection. When you approve, PagerDuty sends you back to the Round Robin dashboard.
Tip
Because the OAuth connection acts as the user who authorizes it, sign in with a PagerDuty account that can see every schedule you plan to use — an admin account is the safe choice.
If the connection ever needs to be re-authorized, use **Refresh Connection** on the PagerDuty card to run the login flow again.
## Disconnect
[Section titled “Disconnect”](#disconnect)
On **Settings → Integrations**, click **Disconnect** on the PagerDuty card and confirm.
Caution
Disconnecting removes the PagerDuty binding from every rotation that uses it. Those rotations revert to **Manual** mode, so on-duty changes stop following the PagerDuty schedule until you reconnect and bind them again.
# MCP server
> Connect an AI assistant such as Claude to Round Robin over the Model Context Protocol to ask who is on call, browse schedules, and manage rotations conversationally.
Round Robin exposes a remote [Model Context Protocol](https://modelcontextprotocol.io) (MCP) server. Connect it to an AI assistant that supports remote MCP servers — Claude, for example — and the assistant can answer questions like “who is on call for PAYMENTS right now?” or “show me the upcoming schedule for the support rotation” using live data from your workspace, and even create and schedule rotations for you (with your confirmation, and only where you have permission).
All results are scoped to your own Slack workspace, which is derived from your sign-in — an assistant cannot ask for data from a workspace you don’t belong to.
## Endpoint
[Section titled “Endpoint”](#endpoint)
| Property | Value |
| -------------- | ------------------------------------------------------------------- |
| URL | `https://api.roundrobinbot.eu/mcp` |
| Transport | Streamable HTTP |
| Authentication | OAuth 2.1 (sign in with the same account you use for the dashboard) |
## Connect your assistant
[Section titled “Connect your assistant”](#connect-your-assistant)
The exact steps depend on your MCP client, but the flow is standard OAuth:
1. Add a remote MCP server in your client and enter the URL `https://api.roundrobinbot.eu/mcp`.
2. The client discovers the authorization server automatically (RFC 9728 protected-resource metadata) and registers itself — dynamic client registration is supported, so no manual client ID is needed.
3. Your browser opens a Round Robin sign-in page. Sign in with the same account you use for the [dashboard](https://app.roundrobinbot.eu).
4. Once you approve, the client receives a token and the tools become available.
For example, in Claude Code:
```bash
claude mcp add --transport http round-robin https://api.roundrobinbot.eu/mcp
```
then run `/mcp` inside Claude Code to complete the sign-in.
Note
The connection acts as **you**: the assistant only sees rotations, users, channels, and groups that are visible in your Slack workspace.
## Available tools
[Section titled “Available tools”](#available-tools)
| Tool | Input | What it returns |
| ----------------------- | --------------------------------------- | ------------------------------------------------------------------------------------------------------------------------------------------------------------------------- |
| `who_is_on_call` | Rotation code (e.g. `PAYMENTS`) | Who is on call now and up next (names, Slack IDs, shift end times), the rotation’s channels, its on-duty user group, whether it is enabled, and whether you are a member. |
| `list_my_rotations` | — | The rotations visible in your workspace, each with name, code, enabled state, who is on call now, its on-duty group, and a `youAreMember` flag. |
| `get_rotation_schedule` | Rotation code, entry count (default 10) | The upcoming duty roster: each entry has the user (ID and name), turn index, and on-duty since/until timestamps (UTC). |
| `list_my_teams` | Count (default 50) | The Slack workspaces you belong to. |
| `get_user_info` | Slack user ID | Display name, real name, handle, email (if visible), and whether it is a bot. |
| `get_group_info` | Slack user group ID | The group’s @handle, name, and description. |
| `get_channel_info` | Slack channel ID | The channel’s name and whether it is private. |
Rotation and schedule results always include human-readable names alongside the raw Slack IDs, so the assistant rarely needs the lookup tools. When it does receive an unknown ID, the lookup tools return a `Found: false` result instead of an error.
The read tools are declared read-only and idempotent (standard MCP tool annotations), so assistants that honor annotations — Slackbot, Claude — run them without confirmation prompts.
### Management tools
[Section titled “Management tools”](#management-tools)
Rotations can also be created and managed conversationally — **through the Slack connection only**. Management tools are reserved for Round Robin’s own Slack integration (Slackbot): a personal connection you register yourself (Claude, Cursor, or any other MCP client) is read-only and does not even see these tools in its tool list. These tools change data, so assistants always summarize the change and ask for your confirmation before running them:
| Tool | Input | What it does |
| ----------------------- | ------------------------------------------------------------------------------------------------------------------------------------ | --------------------------------------------------------------------------------------------------------------------------------------------------- |
| `create_rotation` | Name; optional code, description, members (in rotation order), channels, duty size | Creates an enabled rotation with you as owner. It starts without an automatic schedule — set one with `set_rotation_schedule` or in the dashboard. |
| `update_rotation` | Rotation code; any of: new name, new code, description, members, channels, duty size, enabled | Partially updates a rotation you own — only the fields you provide change. |
| `set_rotation_schedule` | Rotation code; schedule type (`weekly`, `daysOfWeek`, `daily`, `workdays`), time zone, first handover, period; type-specific options | Sets or replaces the rotation’s automatic schedule for the common cases. Advanced options (business hours, custom calendars) live in the dashboard. |
The same rules as the dashboard apply: you must be an owner of the rotation you change, plan limits are enforced, and rotation codes must be unique. Deleting rotations is deliberately not available through assistants — use the dashboard.
## Permissions
[Section titled “Permissions”](#permissions)
Access to the tools is governed by OAuth scopes, which you grant on the consent screen when connecting a client:
| Scope | Grants | Required by |
| ---------------- | ------------------------------------------------------------------ | -------------------- |
| `read:oncall` | Reading rotations, schedules, on-call state, and directory lookups | All read tools |
| `write:rotation` | Creating and updating rotations and their schedules | The management tools |
A connected client can only use tools covered by the scopes you approved, and it only *sees* the tools it can use: a client without `write:rotation` gets a tool list with the read tools alone. `write:rotation` is reserved for first-party surfaces — connecting through Slack grants it automatically, while self-registered clients (a personal Claude or Cursor connection) only ever receive read access. Assistants always ask for confirmation before running a management tool.
## Good to know
[Section titled “Good to know”](#good-to-know)
* **Rotation codes.** The rotation tools identify rotations by their short code (like `PAYMENTS`), the same code you use with slash commands in Slack. `list_my_rotations` is the easiest way for an assistant to discover the codes in your workspace.
* **Changes are owner-gated and confirmed.** The management tools follow the same permission rules as the dashboard, and assistants confirm every change with you first. There is no tool to delete a rotation or advance who is on duty — use the Slack bot or the dashboard for those.
* **Workspace scoping.** The workspace is always taken from your authenticated identity, never from a tool parameter, so a prompt cannot redirect the assistant to another workspace’s data.
# PagerDuty and OpsGenie based rotations
> Link a rotation to a PagerDuty or OpsGenie schedule so members and the user on duty sync automatically.
You can link a Round Robin rotation to a PagerDuty or OpsGenie schedule. The rotation’s members and the user on duty are then sourced directly from the external schedule instead of being managed in Round Robin.
This lets you keep using all of Round Robin’s Slack features — the on-duty group, topics, templates, mentions — without maintaining the same shift plan in two places.
This page uses PagerDuty in the examples; everything applies to OpsGenie as well.
Note
External schedules require the **Pro plan**, and the integration must be connected first. Follow [Integrate PagerDuty with Round Robin](/integrations/integrate-pagerduty-with-round-robin/) or [Integrate OpsGenie with Round Robin](/integrations/integrate-opsgenie-with-round-robin/).
## Link a rotation to a PagerDuty schedule
[Section titled “Link a rotation to a PagerDuty schedule”](#link-a-rotation-to-a-pagerduty-schedule)
Say you have a PagerDuty schedule called *Service X* that manages the on-call duty for a service in your organization.
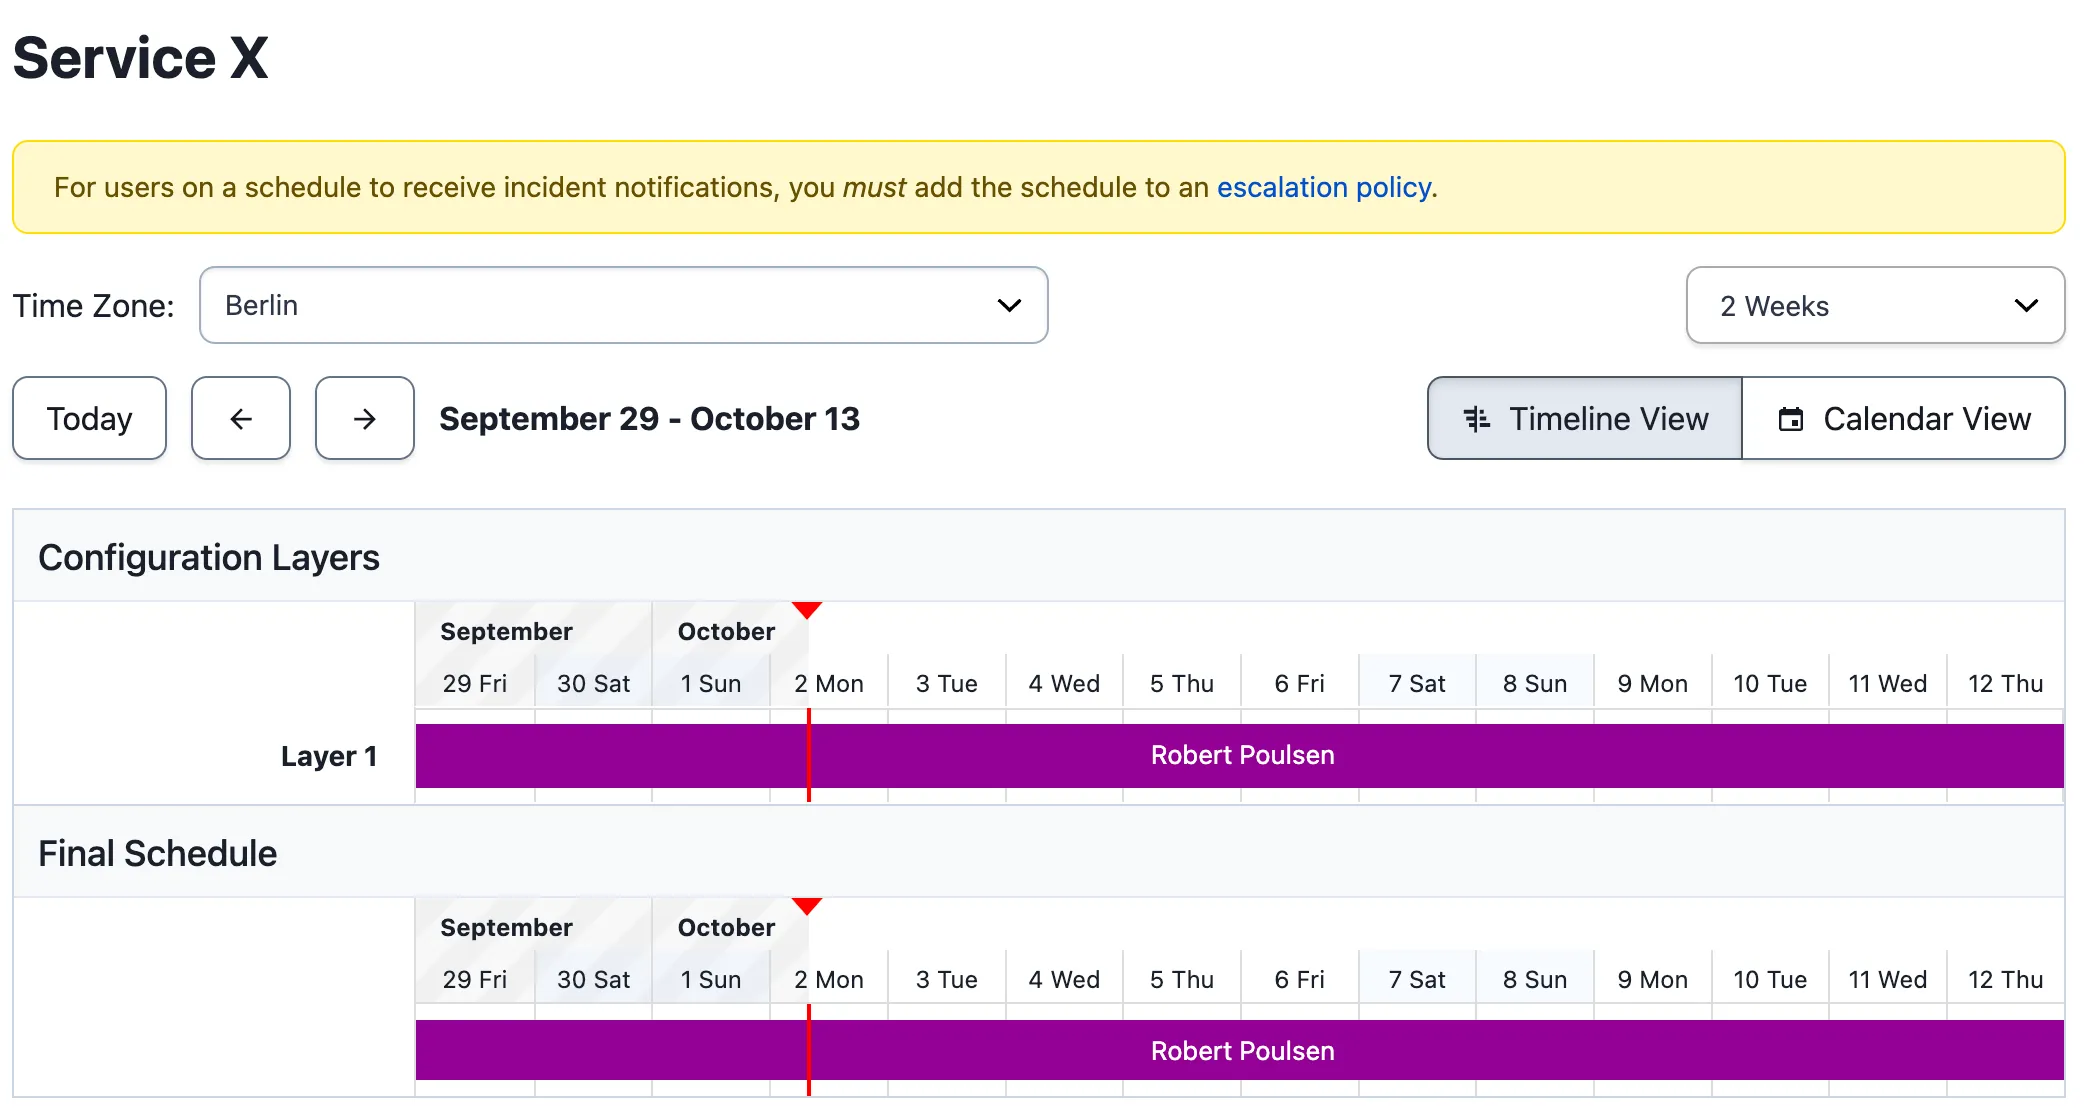
Everything happens in the [dashboard](https://app.roundrobinbot.eu):
1. Create a rotation as usual (the name does not have to match the schedule). Don’t bother adding members — they will be managed automatically. You can still configure channels, topics, and other options.
2. Open the rotation’s page and go to its **Schedule** section.
3. Under **Schedule Type**, pick **PagerDuty** (or **OpsGenie**) in the **External** group. These options only appear when the integration is connected.
4. Search for the schedule by name and select it, then save.
The rotation is now externally managed.
## How the sync works
[Section titled “How the sync works”](#how-the-sync-works)
After the first sync:
* The rotation’s members are replaced with the schedule’s members.
* Whoever is currently on call in the schedule goes on duty in Round Robin.
* When the schedule changes (new members, removed members, a different person on call), the rotation follows.
The sync runs periodically — roughly once a minute — so changes are not reflected in real time.
Users are matched by **email address**: Round Robin looks up each schedule member’s email in your Slack workspace. The rotation’s **Users** panel in the dashboard shows how many schedule members are linked to Slack. If someone is on call but their email does not match any Slack user, Round Robin tracks them as an unmapped external user and shows their name from the external service instead.
Caution
If members are missing, verify that each user’s PagerDuty (or OpsGenie) email address matches their Slack email address.
## What you can and cannot edit
[Section titled “What you can and cannot edit”](#what-you-can-and-cannot-edit)
| Setting | Editable while linked? |
| --------------------------------------------------------- | ---------------------------------------------------------------------------------------- |
| Members and groups | No — the on-call pool is owned by the external schedule and is overwritten on every sync |
| Schedule type and timing | No — the external schedule drives all transitions |
| Channels, topics, templates, on-duty group, other options | Yes — managed in Round Robin as usual |
## Disconnect the schedule
[Section titled “Disconnect the schedule”](#disconnect-the-schedule)
To unlink a rotation, open its **Schedule** section in the dashboard and click **Disconnect external schedule**. The rotation switches back to manual mode, and the members last synced from the schedule are kept as the starting pool. You can re-link an external schedule at any time.
Disconnecting the PagerDuty or OpsGenie integration itself (in **Settings → Integrations**) reverts all bound rotations to manual mode at once.
## From Slack
[Section titled “From Slack”](#from-slack)
In Slack, an externally managed rotation’s description shows the external mode:
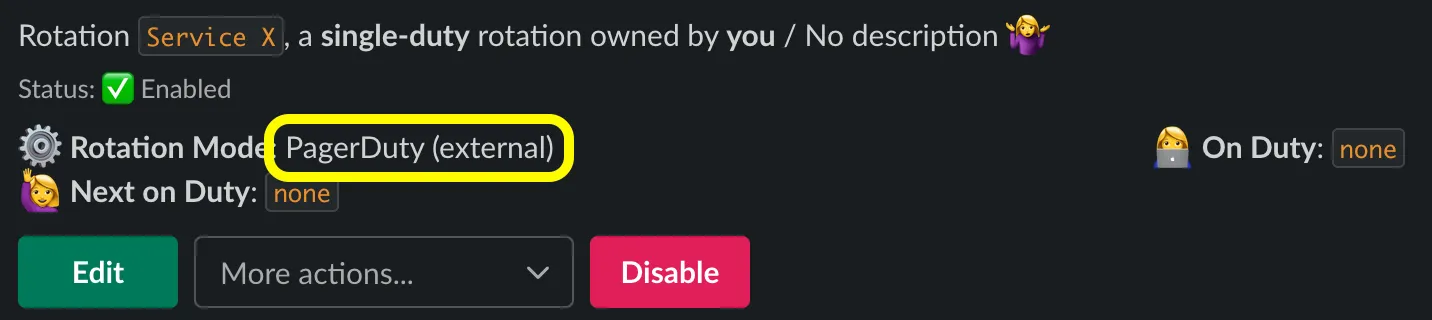
Tip
The Slack “More actions… → Manage integrations…” menu no longer configures the link directly — it points you to the rotation’s page in the dashboard, where all integration connections are managed.
# Rotation mentions
> Let anyone in your workspace mention Round Robin with a rotation code to reach the users currently on duty.
Mentions let anyone in your Slack workspace ask the on-duty users of a rotation for help, without knowing who is on duty. A user mentions the bot with a rotation code in a channel, and Round Robin notifies the people currently on duty, tracks whether someone acknowledges, and reports back to the requester.
Mentions are especially useful when Round Robin cannot manage a Slack user group for you (see [the on-duty user group feature](/groups-management/using-on-duty-handle/)) — for example, when workspace policy restricts user-group changes.
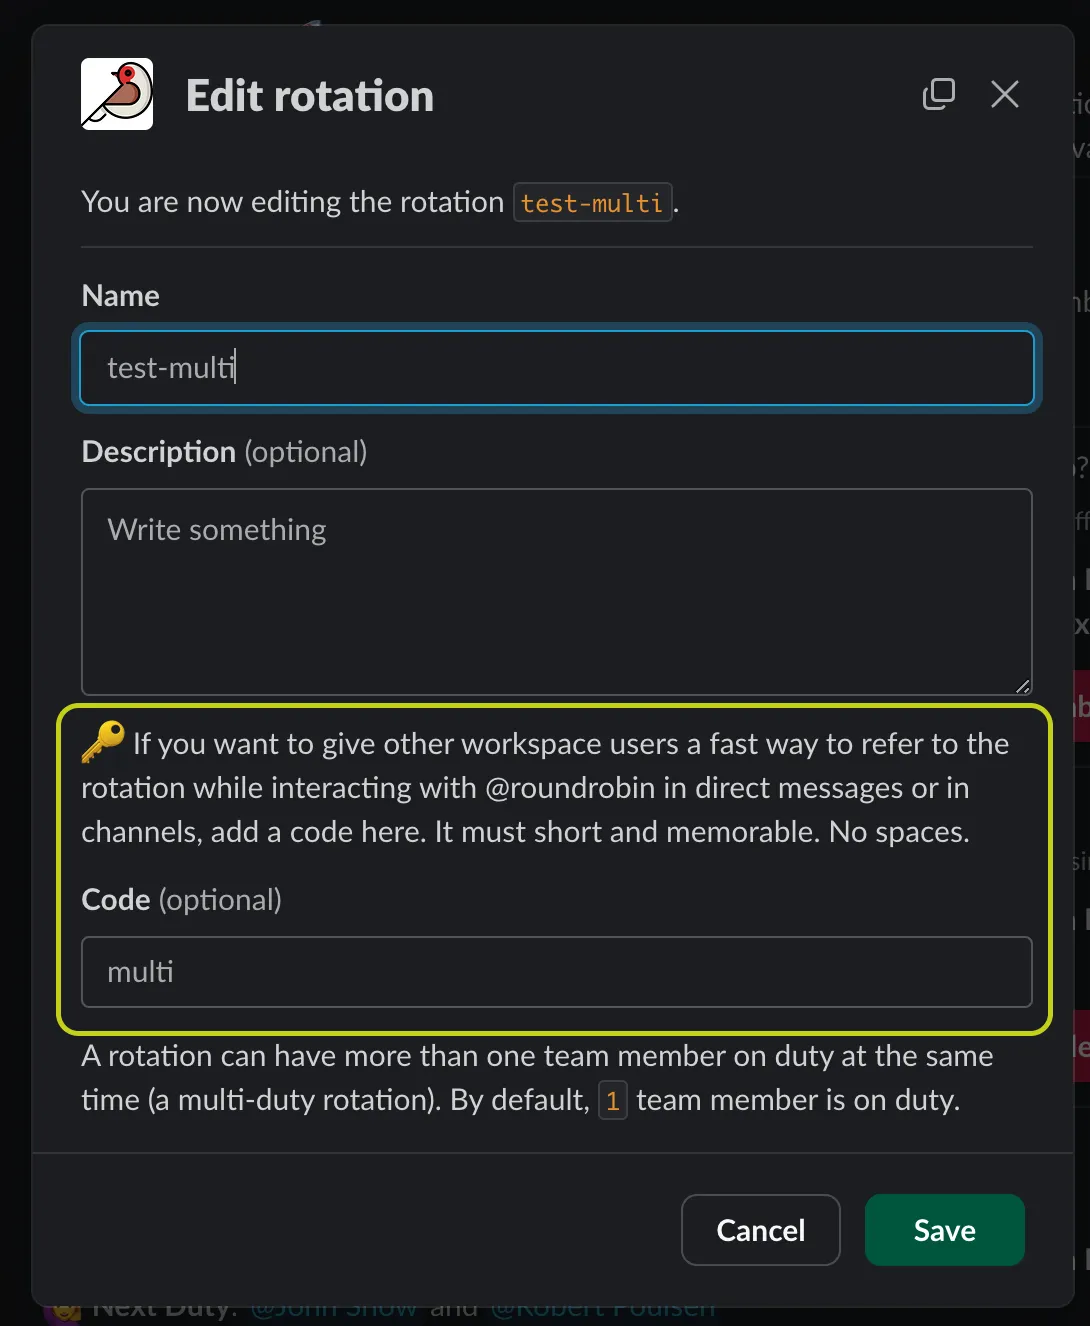
## Set up a rotation code
[Section titled “Set up a rotation code”](#set-up-a-rotation-code)
A mention targets a rotation by its **code**, so the rotation needs one first. In the dashboard at [app.roundrobinbot.eu](https://app.roundrobinbot.eu):
1. Open the rotation and choose **Configure → Edit**.
2. On the **Details** tab, fill in the **Code** field. Keep it short and memorable; letters, numbers, dashes, and underscores are allowed — no spaces.
3. Save the rotation.
Note
Why a code instead of a native Slack tag? Slack does not let apps register custom “taggable” handles, so Round Robin uses `@Round Robin ` instead.
## Configure mention behavior
[Section titled “Configure mention behavior”](#configure-mention-behavior)
Mention behavior is configured per rotation, under **Configure → Options** in the dashboard. Everything beyond the basic flow requires a Pro plan.
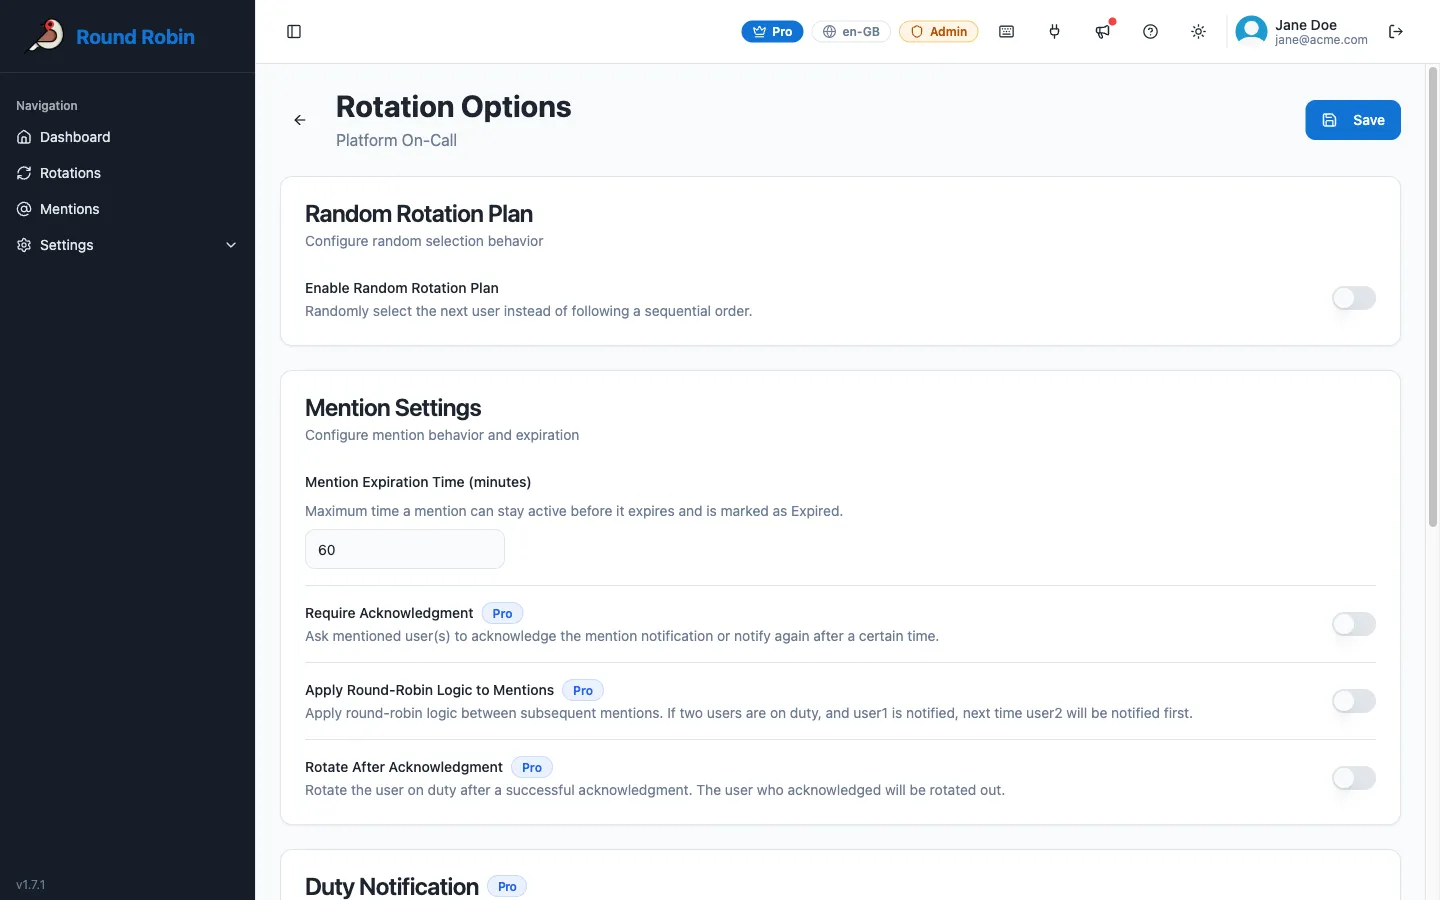
| Option | Plan | What it does |
| ----------------------------------- | ---------------------------------- | ---------------------------------------------------------------------------------------------------------------------------------------------------------------------------------------------------------------------------------------------------------------------- |
| Mention expiration time | Pro to change (default 60 minutes) | Maximum time a mention stays open. If nobody acknowledges before it elapses, the mention expires and closes automatically. |
| Require acknowledgment | Pro | By default a mention is one-shot: on-duty users are notified once, and the mention simply waits until expiration. With this option on, Round Robin notifies again after the number of minutes you set (**Notify again after**, default 10) if nobody has acknowledged. |
| Apply round-robin logic to mentions | Pro | Instead of notifying every on-duty user at once, notify one at a time, rotating who goes first across mentions. |
| Rotate after acknowledgment | Pro | When an on-duty user acknowledges a mention, rotate them out of duty. |
## Create a mention
[Section titled “Create a mention”](#create-a-mention)
Mentions themselves happen in Slack, where the conversation is:
1. Go to a channel where the Round Robin bot is a member.
2. Type `@Round Robin `, for example `@Round Robin multi`. You can add a free-text message after the code; it is forwarded to the on-duty users.
3. Round Robin confirms your request with a message visible only to you, including how long the mention stays open.

If the code does not match any rotation, Round Robin tells you so. Each person can have only one open mention per rotation at a time; if you mention the same rotation again while yours is still open, Round Robin reminds you the request is already pending.
## What happens next
[Section titled “What happens next”](#what-happens-next)
Each notified on-duty user receives a direct message with **Ack** and **Pass** buttons.
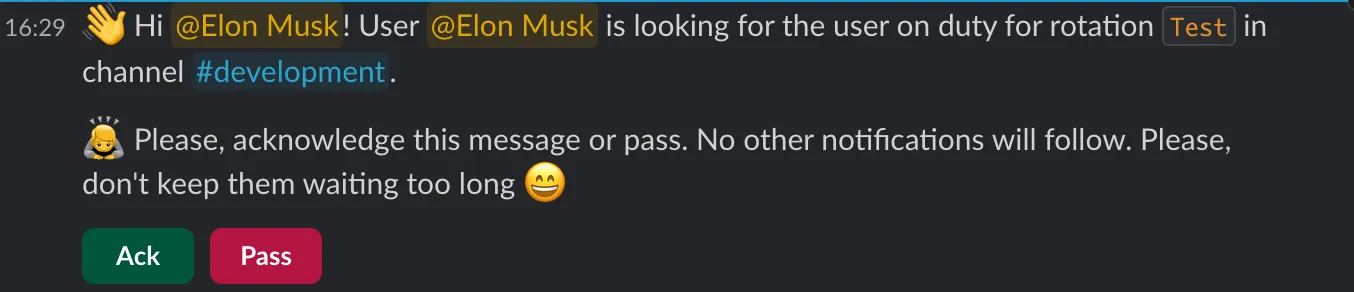
* **Ack** — the requester is told who acknowledged, and contact is established. The mention closes.
* **Pass** — the user declines. If other on-duty users were also notified, the mention stays open for them; if nobody notified is left, Round Robin either notifies again (depending on the rotation’s mention options) or closes the mention and informs the requester that nobody could answer.

If nobody is on duty when the mention is created, the requester is informed immediately and the mention closes.

With **Require acknowledgment** on, on-duty users who have not responded are reminded after the configured minutes.

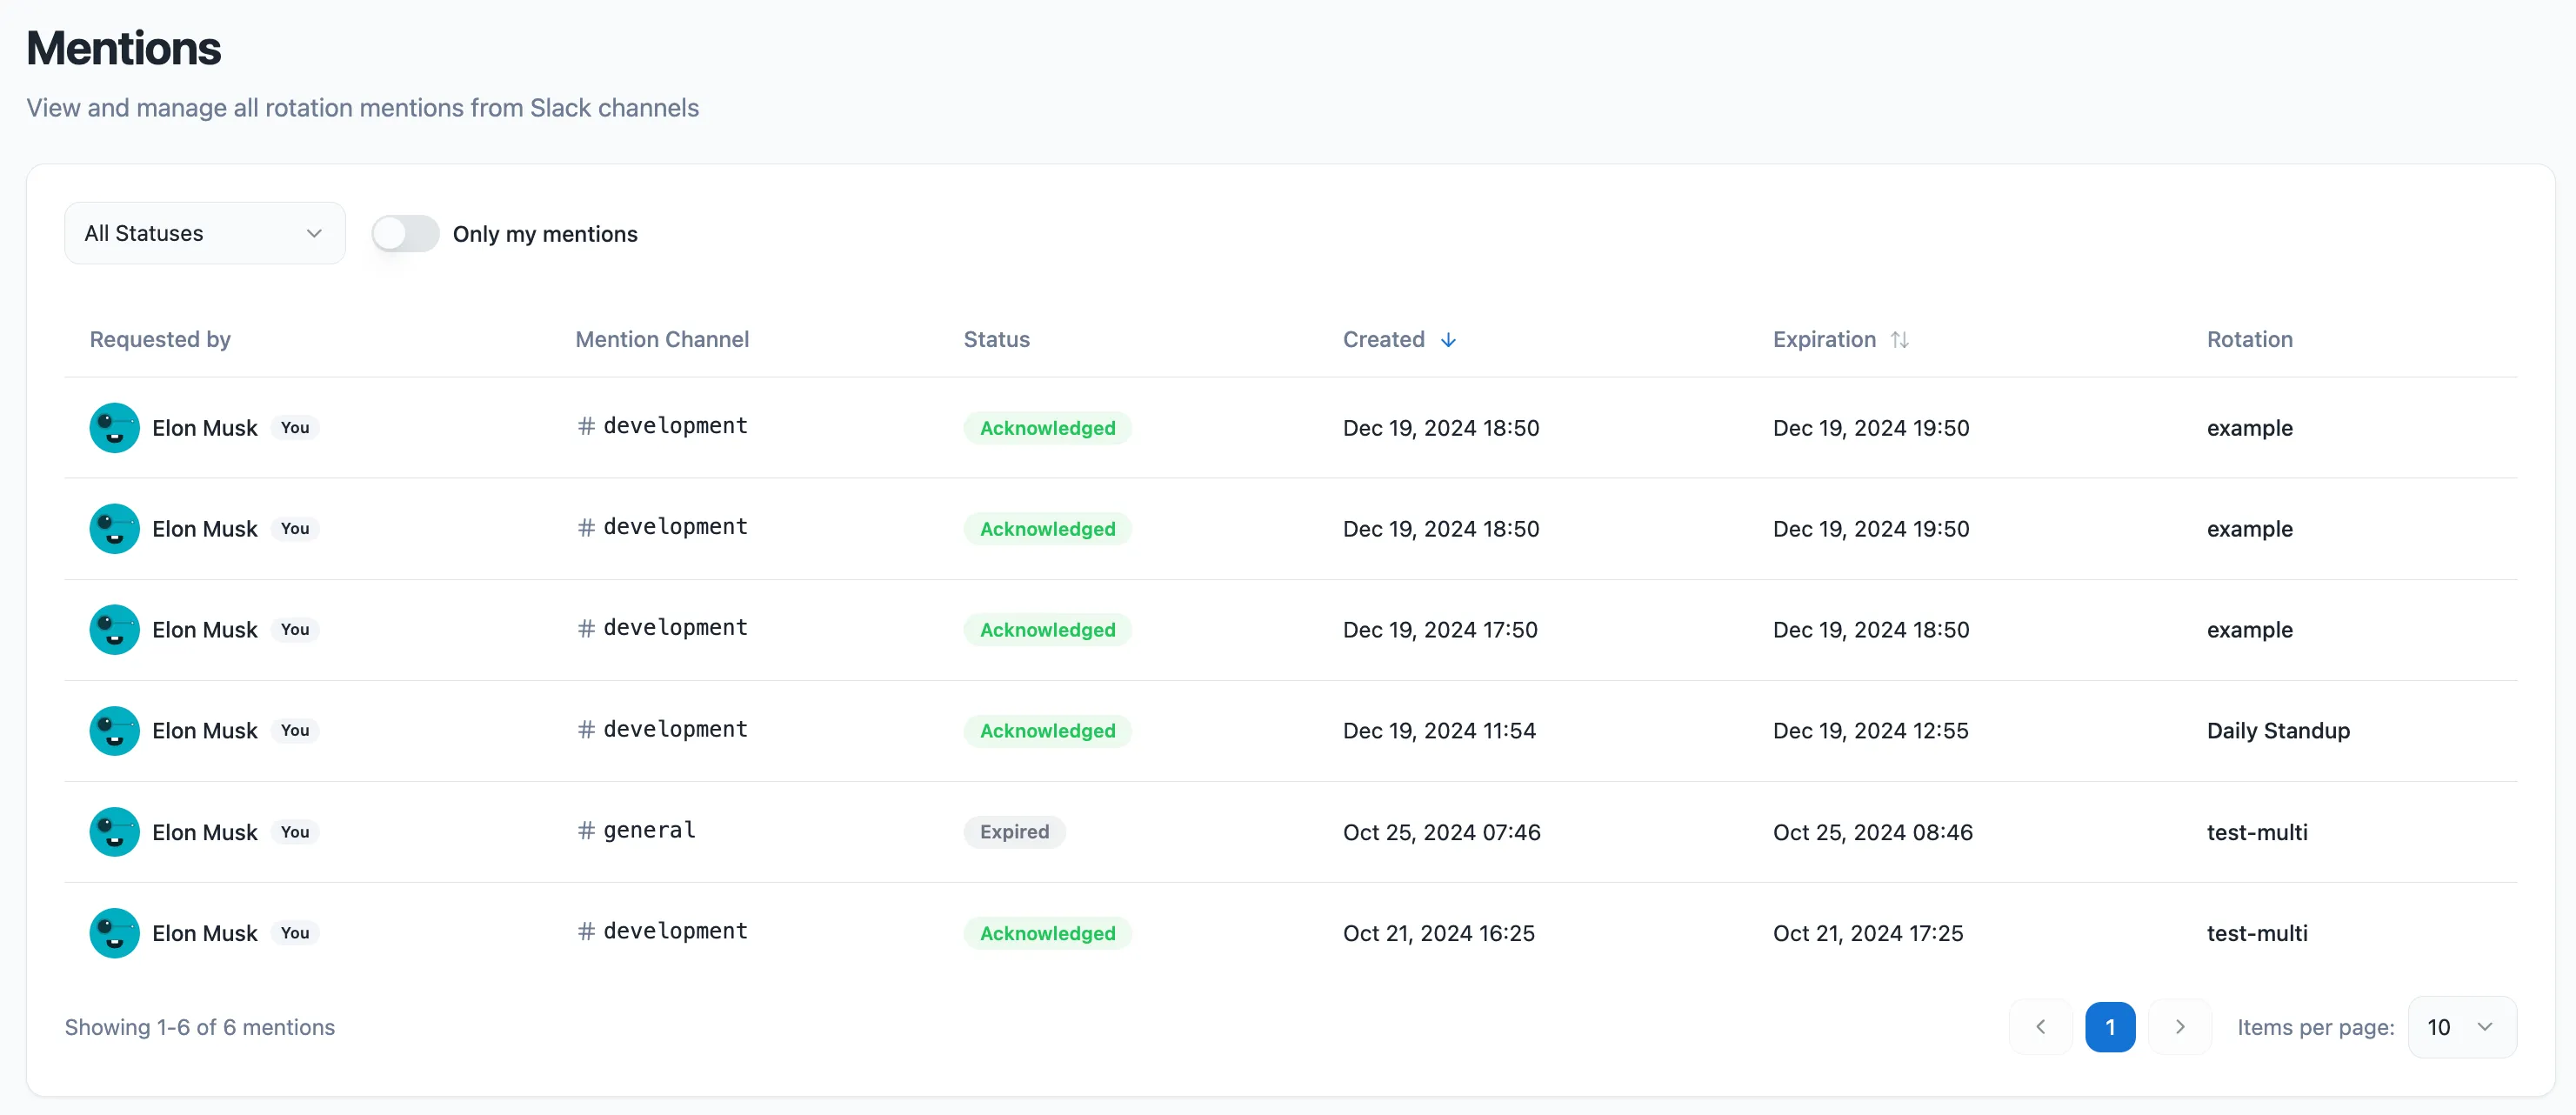
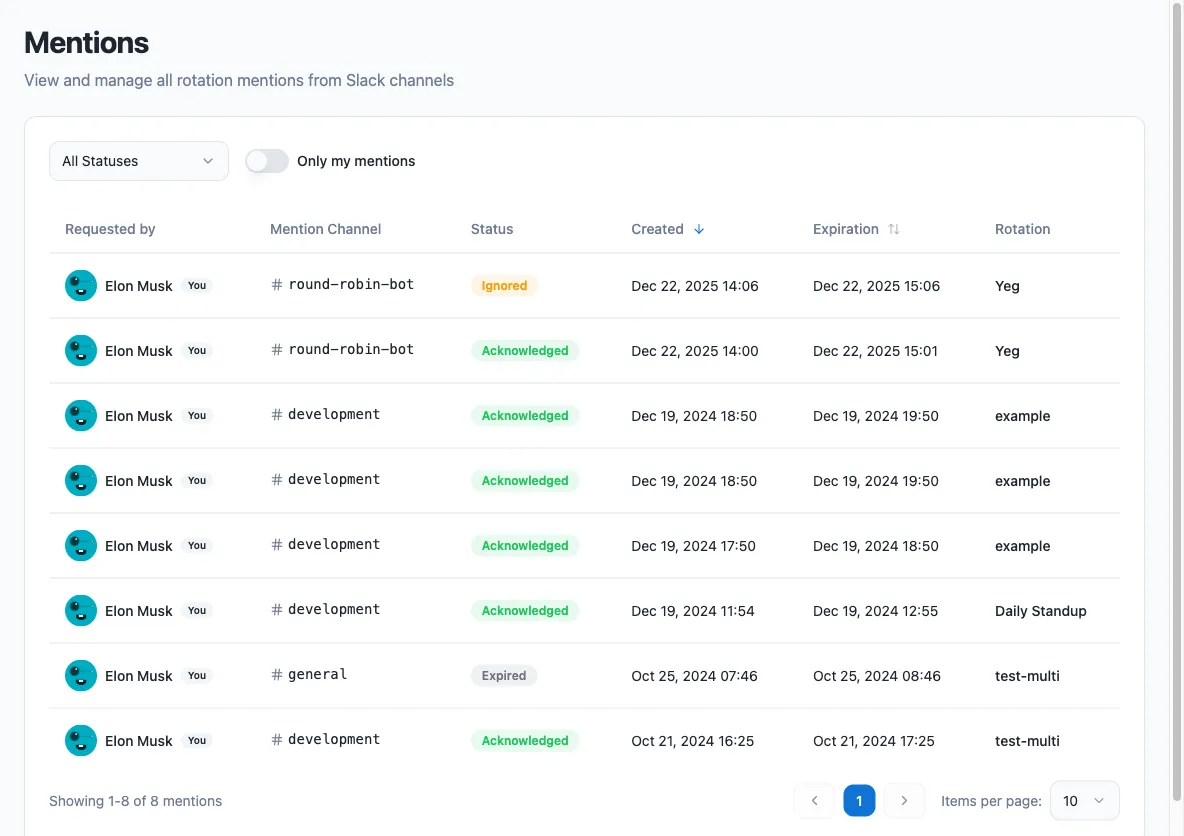
## Track mentions in the dashboard
[Section titled “Track mentions in the dashboard”](#track-mentions-in-the-dashboard)
The dashboard’s **Mentions** page lists all mentions and their status (open, acknowledged, ignored, expired), so you can review activity across your rotations.
## How round-robin mentions work
[Section titled “How round-robin mentions work”](#how-round-robin-mentions-work)
Suppose a rotation has three users on duty: Robert, John, and Jack.
* A mention is created and only Robert is notified.
* When the next mention is created, John is notified first, then Jack on the one after, and so on.
On its own, this option only changes who gets notified: if the notified user passes, the mention closes and the requester is told nobody could answer. Combine it with **Require acknowledgment** to walk through the on-duty users within a single mention: if Robert passes, or neither acknowledges nor passes within the configured minutes, John is notified next instead of Robert being reminded.
Note
Round-robin mentions cannot work through Slack user groups. Slack does not allow bots to be members of user groups, so Round Robin cannot intercept messages that tag a group handle — only direct mentions of the bot.
## From Slack
[Section titled “From Slack”](#from-slack)
You can also set the rotation code without leaving Slack: open the rotation for editing and fill in the **Code** field in the edit modal, then save.
# Business hours rotations
> Restrict a rotation's on-duty time to specific hours of the day, with nobody on duty outside those hours.
Business hours mode restricts duties to specific hours of the day. Outside those hours the rotation has no user on duty; when business hours start again, the same users come back on duty — unless a scheduled shift change happened in the meantime, in which case the next users in the plan take over.
A typical use case is a support rotation that should only be active during working hours (for example, 9 to 6).
Note
Business hours mode requires a Pro subscription. It is not available for [external rotations](/rotation-management/external-rotations/) (rotations synced from PagerDuty or OpsGenie), because the external provider owns the schedule. See [Billing](/billing/billing/) for plan details.
## Enable business hours
[Section titled “Enable business hours”](#enable-business-hours)
You configure business hours from the dashboard at [app.roundrobinbot.eu](https://app.roundrobinbot.eu).
1. Open the rotation and select **Configure → Options**.

2. In the **Business Hours** card, turn on **Enable Business Hours**.
3. Select the **timezone** your time blocks refer to. This is independent of the schedule’s time zone — if the rotation is scheduled, the two can differ.
4. Define one or more **time blocks**. Use **Add Block** to create multiple blocks per day, for example 9:00–13:00 and 14:00–18:00 to keep lunch as off-time. Blocks cannot overlap, and each block must end after it starts.

5. Save the rotation options.
### Additional options
[Section titled “Additional options”](#additional-options)
| Option | Effect |
| --------------------------------------------------------------------------------------- | -------------------------------------------------------------------------------------------------------------------------------------------------------------------------------------------------------------------------- |
| If the rotation is skipping weekends or holidays, consider the skipped days as off-time | When the rotation’s schedule skips a day (for example, a working-days rotation on a weekend or holiday), that whole day counts as off-time too: nobody is on duty from Friday evening until Monday morning. |
| Do not notify channels if a user has multiple business hours shifts in sequence | Suppresses the daily on/off-duty channel notifications when the same user stays on duty across consecutive business-hours slots — for example, a user on duty Monday to Friday 9 to 5 is only announced once at the start. |
## How the rotation behaves
[Section titled “How the rotation behaves”](#how-the-rotation-behaves)
While business hours are active, the rotation works as usual. When a business-hours slot ends, everyone is taken off duty; when the next slot begins, the users who were on duty before come back automatically.
If the rotation is scheduled and a shift change falls inside off-time, no duty switch happens immediately. Instead, the next users in the plan are recorded and go on duty when business hours resume.
### Reading the status in the dashboard
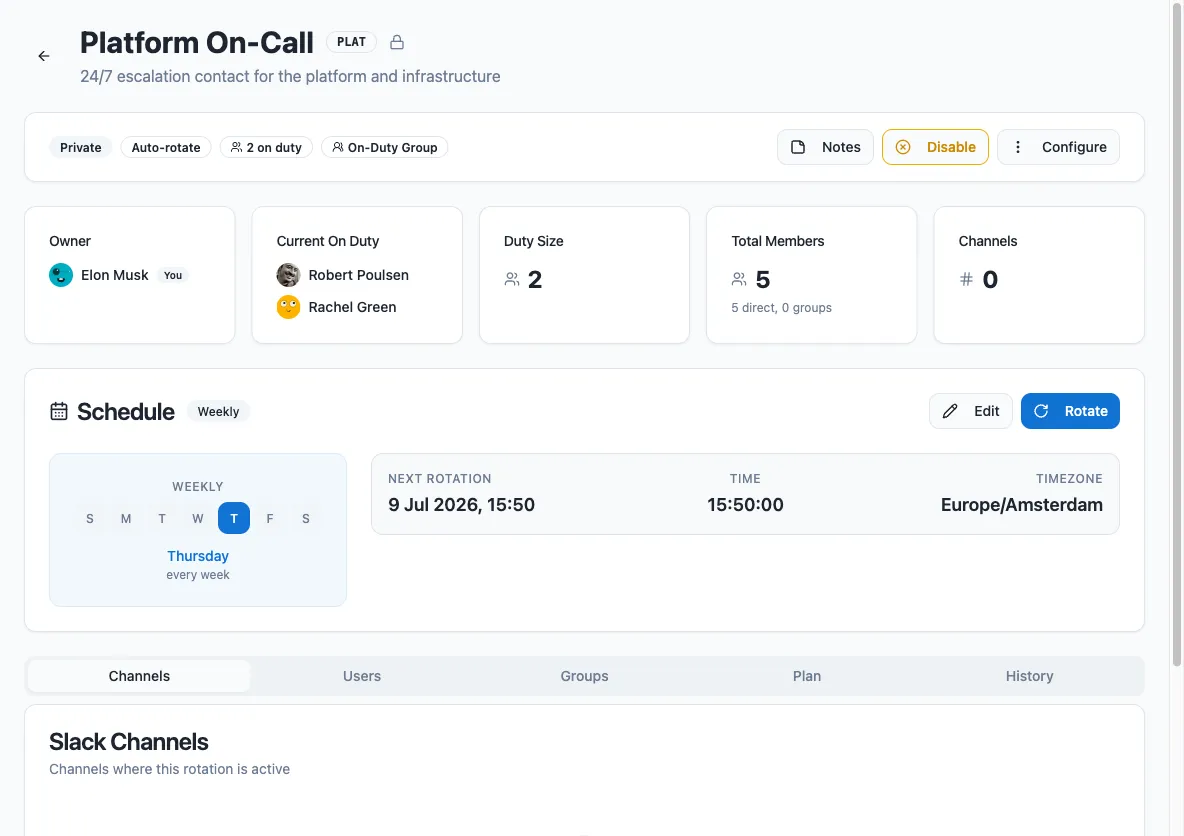
[Section titled “Reading the status in the dashboard”](#reading-the-status-in-the-dashboard)
Rotation cards and the rotations table show a small status icon when business hours are enabled: a clock while business hours are active, and a coffee cup while the rotation is paused outside business hours.
## From Slack
[Section titled “From Slack”](#from-slack)
The rotation view in Slack shows a business-hours badge with the configured time blocks. Slack renders these times in your own local time zone.
During business hours, the **Next on Duty** block shows who takes over at the next shift change, marked with a `next shift` label:

When the rotation is off-business, **On Duty** shows an `off-business hours` marker with a coffee icon instead of a user, and **Next on Duty** shows who goes back on duty when the next slot starts, together with the restart time — usually the same users as before:

If a scheduled shift change occurs before the next business-hours slot begins, **Next on Duty** shows the following users in the plan instead.
## Related pages
[Section titled “Related pages”](#related-pages)
* [Create or edit a schedule](/rotation-management/create-or-edit-a-schedule/) — configure weekend and holiday skips that the off-time option builds on.
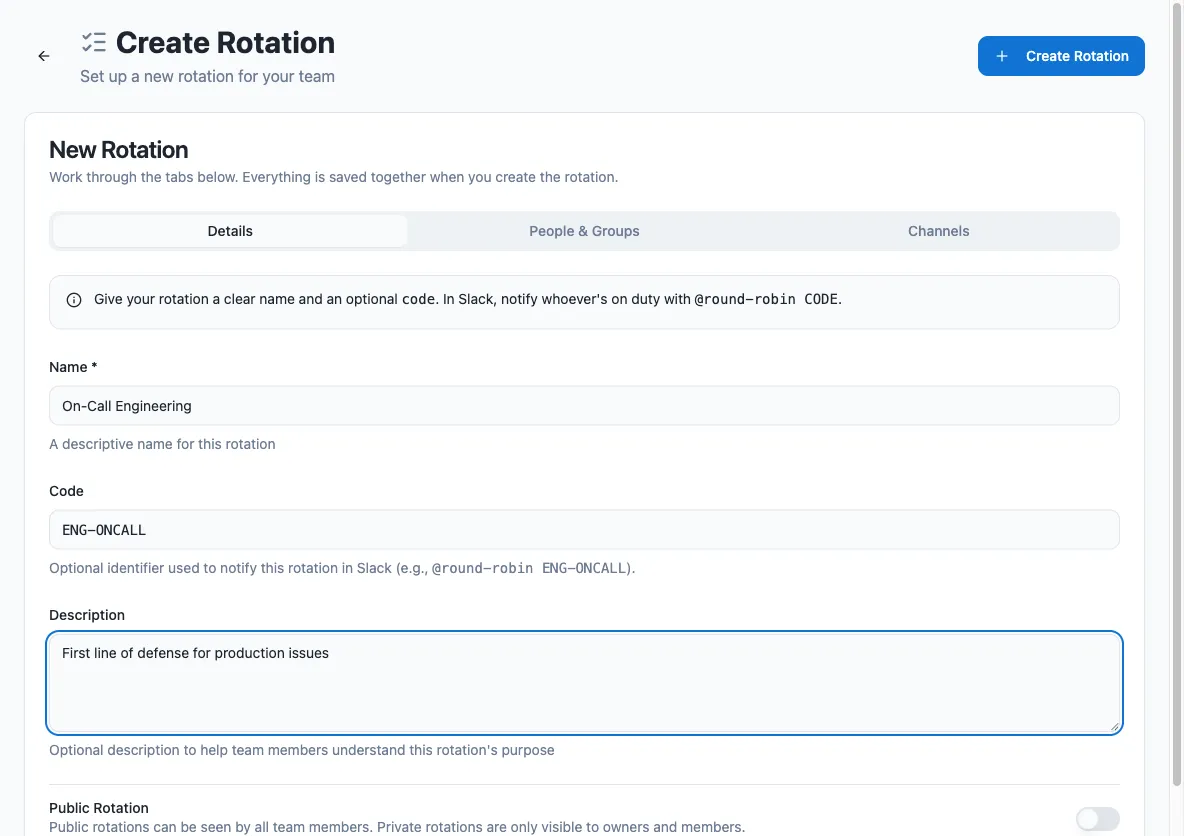
# Create a rotation
> Create your first rotation from the web dashboard, or quickly from Slack with /rr.
A rotation is the core element of Round Robin: a pool of people (added directly or through Slack user groups) who take turns being on duty. This tutorial walks you through creating your first rotation from the web dashboard — the primary way to manage Round Robin — with Slack as a quick alternative.
## Create a rotation from the dashboard
[Section titled “Create a rotation from the dashboard”](#create-a-rotation-from-the-dashboard)
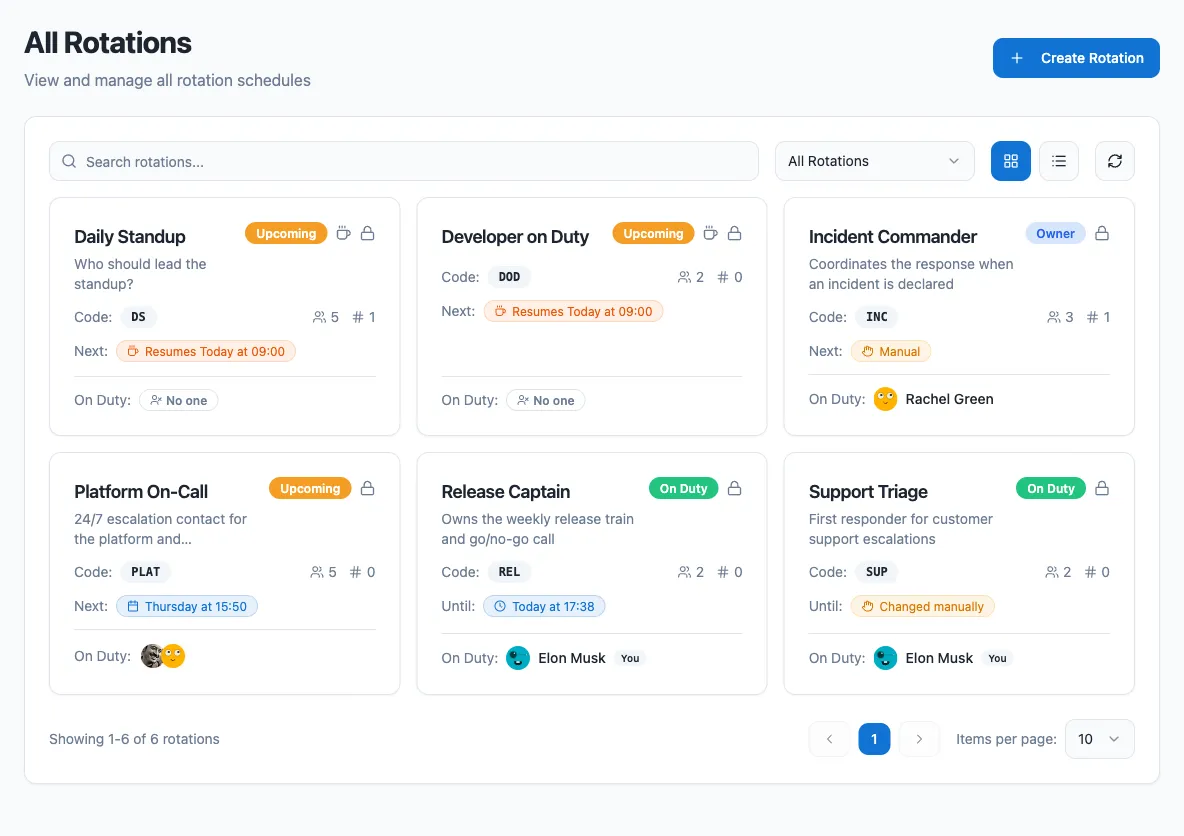
1. Sign in at [app.roundrobinbot.eu](https://app.roundrobinbot.eu) and open **Rotations**. This page lists all rotations you can see, with search and filters.
2. Click **Create Rotation**.
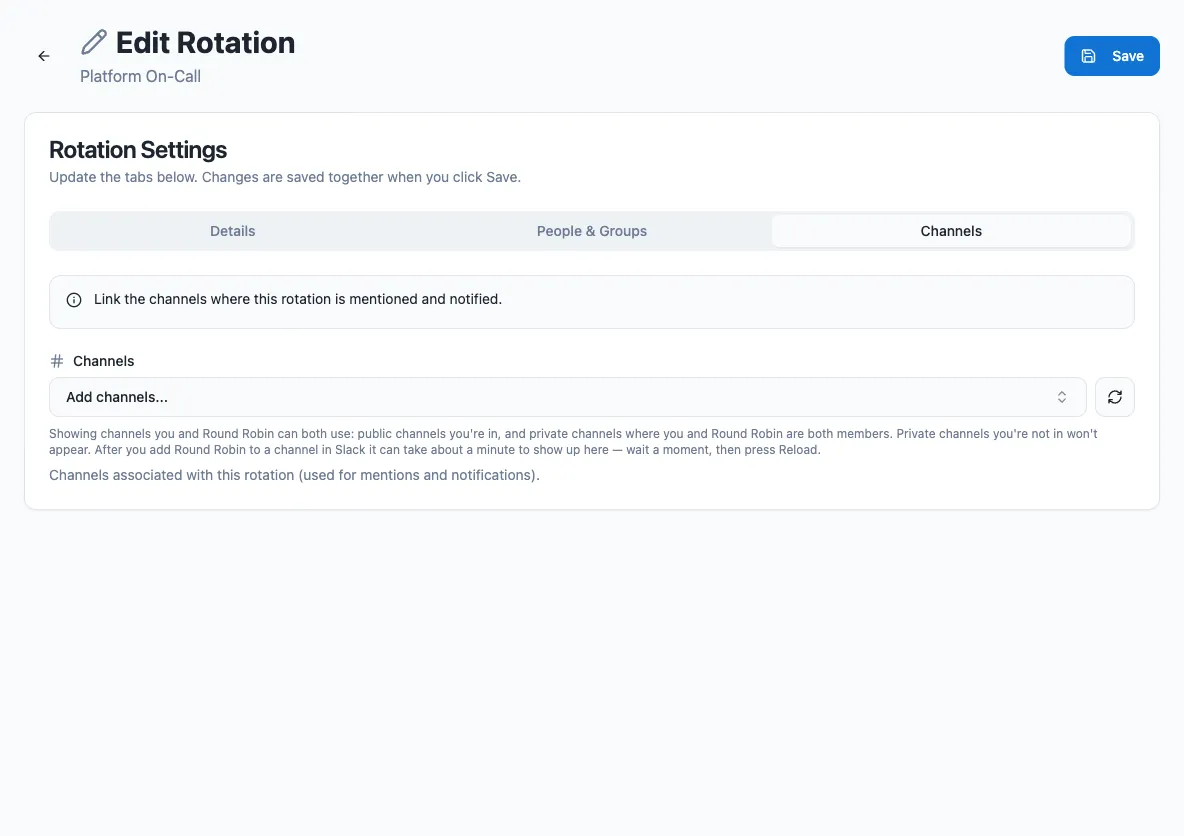
3. Work through the three tabs — **Details** (name, code, description, public/private), **People & Groups** (owners, members, member user groups), and **Channels**. Everything is saved together.

4. Click **Create Rotation**. You land on the new rotation’s page, where you can continue with schedules, templates, and integrations.
A few dashboard-specific details:
* The **Code** field accepts only letters, numbers, and hyphens, and is stored uppercase.
* You are pre-filled as an owner and cannot remove yourself.
* You can leave members, groups, and channels empty and configure them later from the rotation page or from Slack.
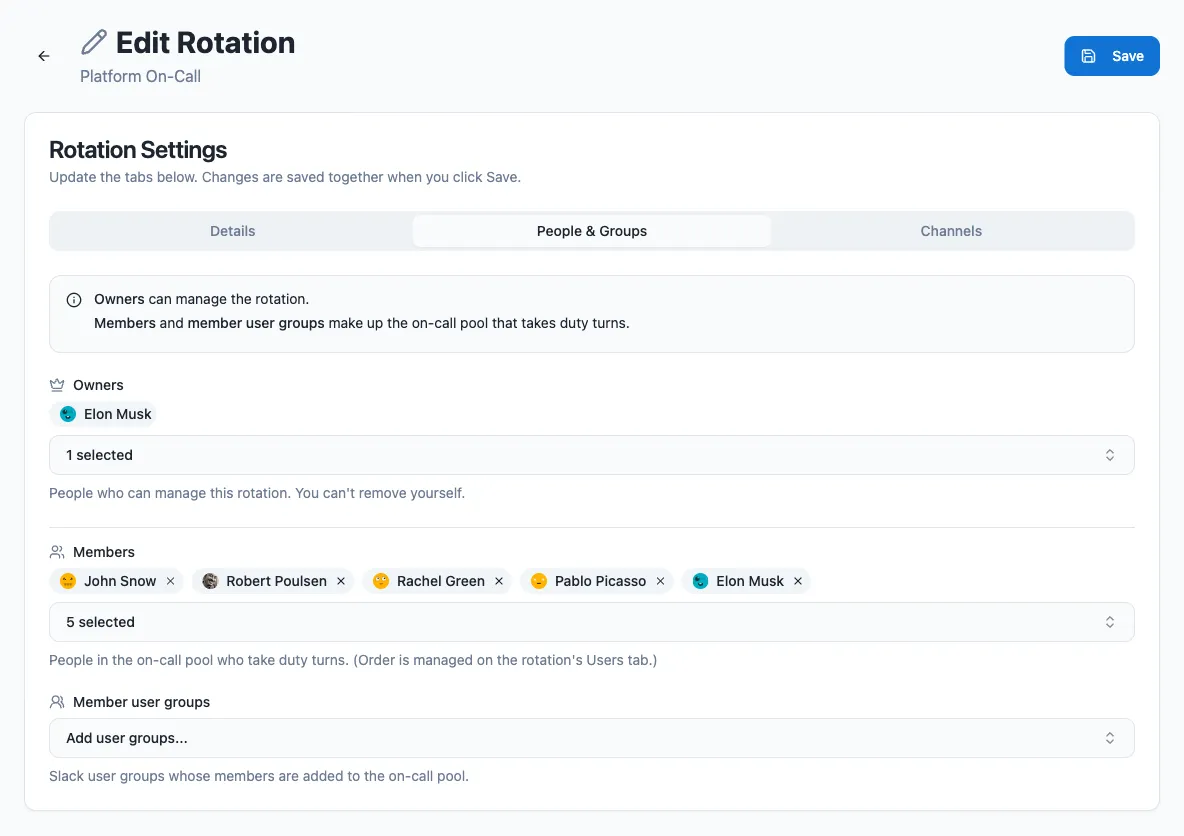
### Rotation fields
[Section titled “Rotation fields”](#rotation-fields)
| Field | Required | Plan | What it does |
| ----------- | -------- | ---- | ----------------------------------------------------------------------------------------------------------------------------------------------------------------------------------------------------------------------------------------------------------------------------------------------------------- |
| Name | Yes | All | Identifies the rotation everywhere. |
| Description | No | All | Helps members understand what the rotation is for. |
| Code | No | All | A short, memorable identifier (no spaces) other users can use to notify whoever is on duty by mentioning the bot, e.g. `@Round Robin ENG-ONCALL`. See [Mentions](/mentions/what-are-mentions/). |
| Duty size | No | Pro | How many members are on duty at the same time (default `1`). |
| Owners | Yes | Pro | Owners manage the rotation and are the only ones who can edit it. Being an owner does not make you a member. You must always be in the owners list yourself — the form is rejected otherwise, so you cannot lock yourself out. On the free plan the field is hidden and you become the owner automatically. |
| Visibility | No | Pro | Mark the rotation as private to make it visible only to owners and members. By default a rotation is public. Free-plan rotations are always public. |
| Channels | No | All | Channels notified on rotation events, such as a change of duty. The bot cannot post to private channels it is not a member of. |
| Members | No | All | Users in the on-call pool who take duty turns. |
| Groups | No | All | Slack user groups whose members join the pool. If the group’s membership changes later, the rotation updates automatically. |
Note
If your workspace is at or above its plan’s rotation limit, no new rotations can be created until you free a slot or upgrade. See [Billing](/billing/billing/).
## Edit a rotation
[Section titled “Edit a rotation”](#edit-a-rotation)
Open the rotation from the **Rotations** list and edit it. The same tabs appear pre-populated with the current values: use **People & Groups** to manage owners, members, member user groups, and duty size, and **Channels** to change which channels are notified.
Caution
Rotations linked to an external schedule (PagerDuty or Opsgenie) are externally managed: you cannot edit their members or duty size, because the on-call pool is synced from the integration.
## From Slack
[Section titled “From Slack”](#from-slack)
You can also create and edit rotations without leaving Slack. The central Round Robin command is `/rr` — usable in a direct message with the bot or in any channel.
1. Type `/rr` in any conversation. The bot replies with your rotations list. The first time, it looks like this:

2. Click **Create**. The **New rotation** modal opens with the same fields described in the table above.
3. Fill in at least a **Name**, then click **Create**. The bot confirms with a summary of the new rotation:

All bot replies in this flow are visible only to you, not to the whole channel.
You can also open the same modal from the Slack shortcut menu (look for **Create a rotation**) or from the bot’s App Home tab with the **New rotation** button.

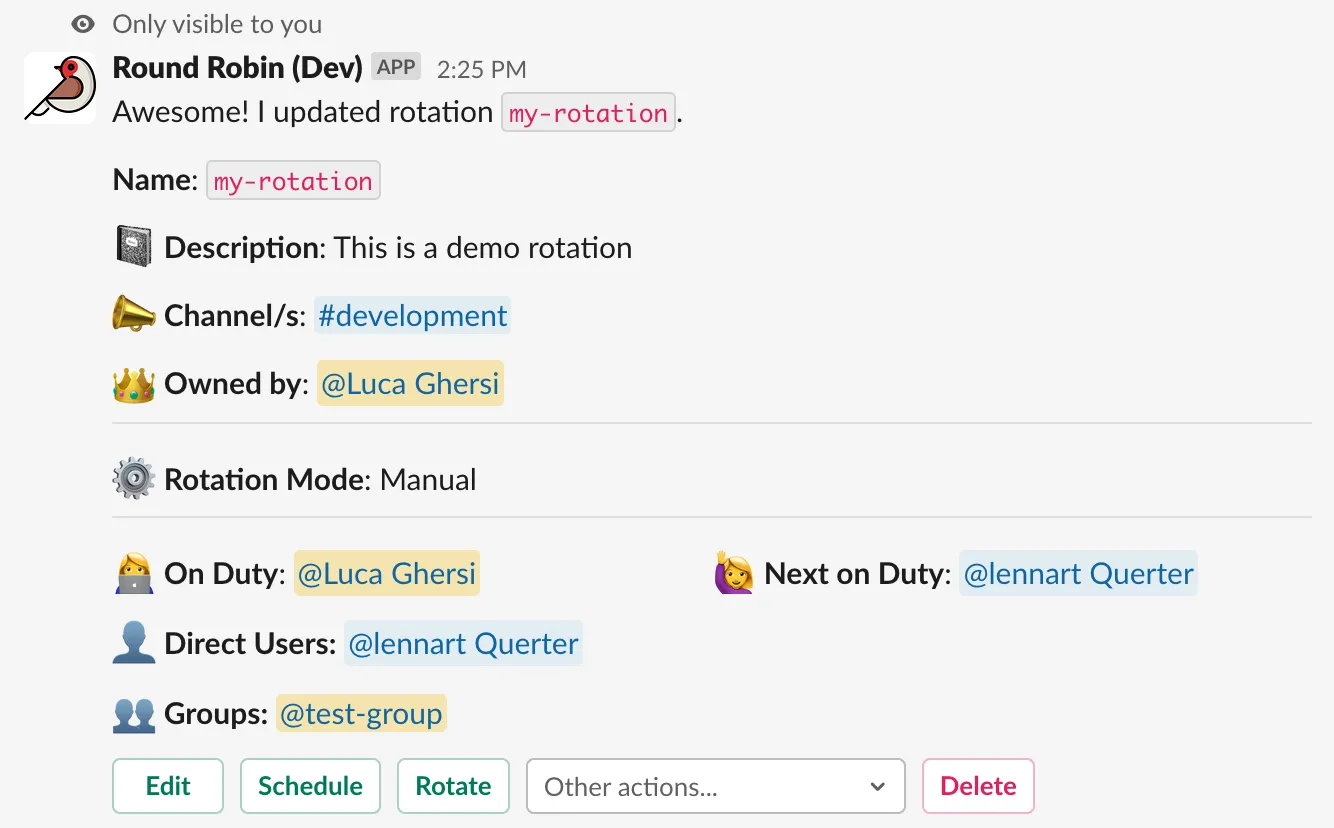
Editing works the same way: open the rotation from `/rr` and choose to edit it, and the modal appears pre-populated. After you **Save**, the bot shows the updated state of the rotation:
## Next steps
[Section titled “Next steps”](#next-steps)
* [Create or edit a schedule](/rotation-management/create-or-edit-a-schedule/) to rotate duty automatically.
* [Customize messages](/customizations/message-management/) the bot posts on duty changes.
# Create or edit a schedule
> Add an automatic schedule to a rotation, choose a cadence, and skip weekends and national holidays.
A rotation runs in one of two modes: **manual**, where you rotate people yourself with the **Rotate** button, and **auto**, where Round Robin moves to the next person on a schedule you define. Adding a schedule switches the rotation to auto mode; removing it (or picking the **Manual** type) switches it back to manual.
## Edit the schedule in the dashboard
[Section titled “Edit the schedule in the dashboard”](#edit-the-schedule-in-the-dashboard)
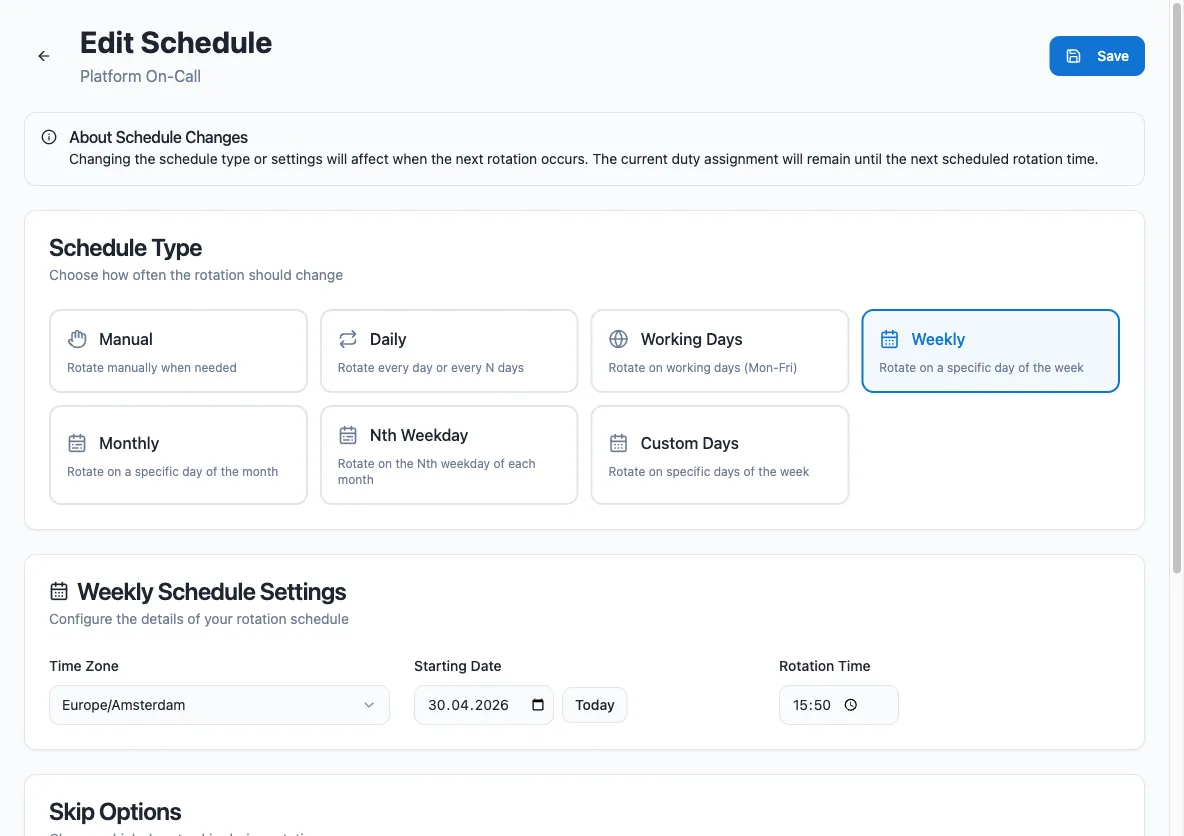
1. Open the [dashboard](https://app.roundrobinbot.eu) and select your rotation. The **Schedule** card shows the current cadence, the next rotation time, and its time zone. You need edit rights on the rotation, and the rotation must be enabled.

2. On the **Schedule** card, press **Edit** to open the schedule editor.
3. Pick a schedule type. The settings section below updates with the fields for that type.
4. Fill in the time zone, starting date, and rotation time (plus any type-specific fields), review the **Skip Options**, and press **Save**.
To return a rotation to manual mode, select the **Manual** schedule type and save.
Note
Changing the schedule type or settings affects when the *next* rotation occurs. The current duty assignment stays in place until the next scheduled rotation time.
## Schedule types
[Section titled “Schedule types”](#schedule-types)
| Type | Rotates | Example |
| ------------ | ------------------------------------------------------------ | --------------------------------- |
| Daily | One or more times per day, at fixed time slots | Every day at 08:00 and 20:00 |
| Working Days | Every `period` working days, based on the selected countries | Every two working days |
| Weekly | The same weekday, every `period` weeks | Every Monday; every second Monday |
| Monthly | The same day of the month | The 10th of every month |
| Nth Weekday | The chosen occurrence(s) of a weekday, every `period` months | The second Monday of the month |
| Custom Days | Each selected weekday, every week | Monday, Wednesday, and Friday |
### Period
[Section titled “Period”](#period)
Where a schedule type supports a period, it controls the gap between rotations:
* **Weekly**: a period of 1 means every week, 2 means every two weeks, and so on.
* **Working Days**: 2 means every two working days, 3 every three, and so on.
* **Nth Weekday**: the period counts months. A period of 2 with “first Monday” rotates on the first Monday every two months.
### Daily schedules
[Section titled “Daily schedules”](#daily-schedules)
The daily type is designed for shifts that change one or more times per day, for example 24/7 support handovers. Time slots use `HH:mm` (24-hour) or `H:mm AM/PM`; if you omit the minutes, `:00` is assumed.
## Time zone
[Section titled “Time zone”](#time-zone)
Every schedule runs in a time zone you pick during creation (in IANA format, for example `Europe/Berlin`), independent of your own Slack time zone. It defaults to your Slack time zone.
Once set, a schedule time of 10:00 means 10:00 in that time zone — the rotation fires there, not in your local time.
## Skipping weekends and holidays
[Section titled “Skipping weekends and holidays”](#skipping-weekends-and-holidays)
Every schedule type can skip non-working days based on one or more countries:
* **Working Days** schedules require at least one country — that is how Round Robin knows which days count as working days.
* All other types offer two optional checkboxes, **Skip weekends** and **Skip national holidays**. For either to take effect, select at least one country.
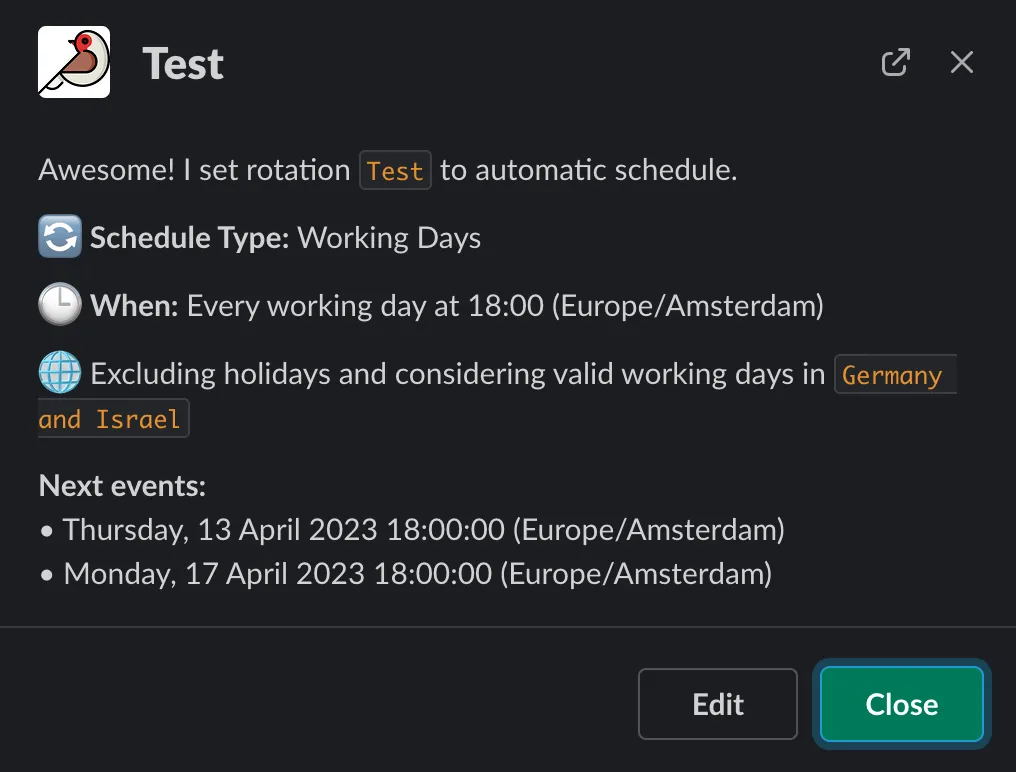
You can select multiple countries, and their effects combine. For example, a working-day rotation for Germany and Israel skips Friday and Saturday (the Israeli weekend) as well as Saturday and Sunday (the German weekend):
Public holidays work the same way: a rotation scheduled over the Easter break with Germany selected skips both Good Friday and Easter Monday.
Note
Only **national** public holidays are considered, not regional ones. For example, Easter Monday is not a holiday in Scotland, so it does not count as a national UK holiday.
## From Slack
[Section titled “From Slack”](#from-slack)
You can also manage schedules without leaving Slack:
1. Run `/rr` to list your rotations.
2. On the rotation you want to schedule, press **Schedule** (or **Reschedule** if it already has one).
3. Pick a schedule type; the modal updates with the fields for that type. Fill in the starting date, time, and time zone, then submit.
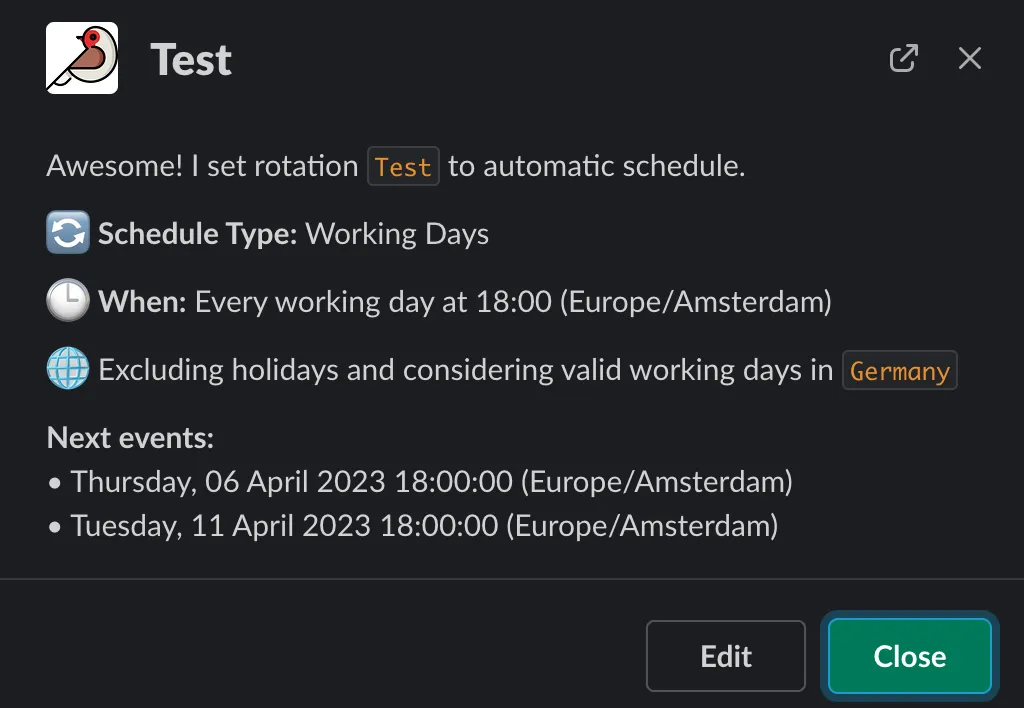
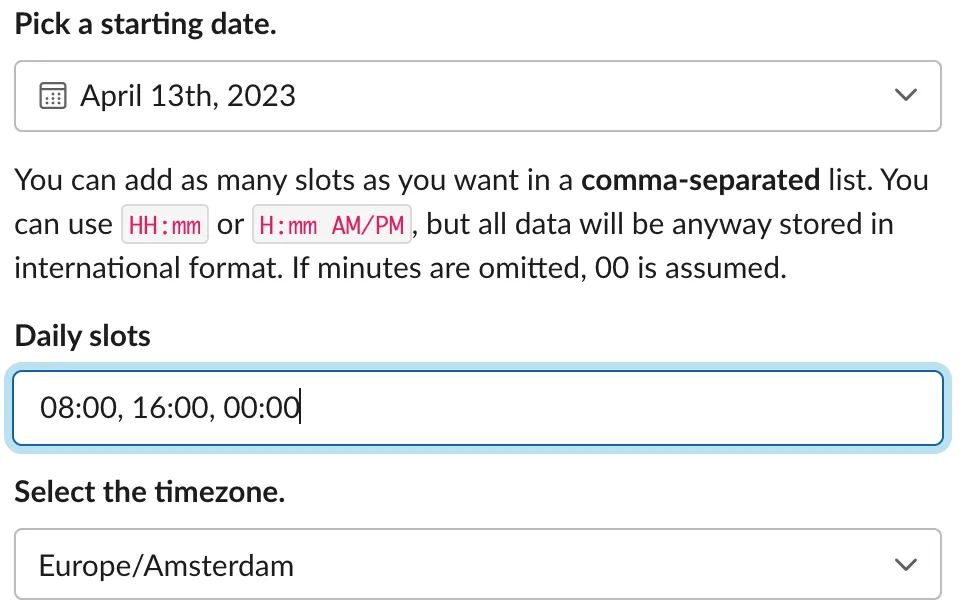
For daily schedules, enter the time slots as a comma-separated list:
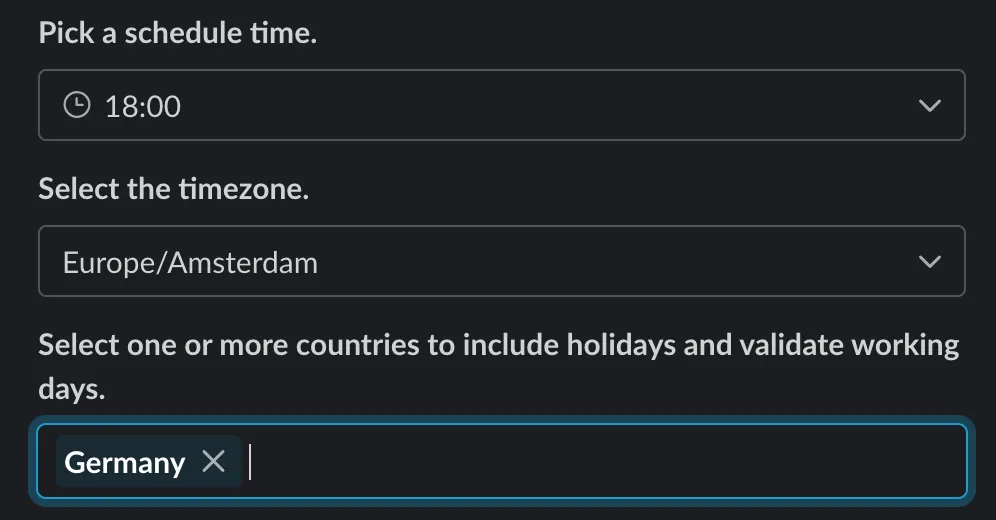
Country selection for weekends and holidays works the same as in the dashboard:
To remove a schedule, open the rotation’s **More actions…** menu and choose **Remove schedule**. The rotation returns to manual mode.
Tip
To see a schedule translated to your own time zone, use **Describe (privately)** from the rotation’s **More actions…** menu in Slack.
# External rotations
> Bind a rotation to a PagerDuty or OpsGenie schedule so members and on-call duty sync automatically from your on-call provider.
An external rotation is a Round Robin rotation whose schedule is owned by an outside on-call provider — **PagerDuty** or **OpsGenie**. Round Robin periodically reads the provider schedule and keeps the rotation in sync: the member list mirrors the schedule’s participants, and whoever is on shift in the provider becomes the on-duty user in Slack. You keep all the Slack-side features — mentions, channel topics, shift notifications — without managing the same shifts in two places.
Note
External rotations are a **Pro plan** feature.
## Connect a rotation to an external schedule
[Section titled “Connect a rotation to an external schedule”](#connect-a-rotation-to-an-external-schedule)
Before you start, connect your provider in the [dashboard](https://app.roundrobinbot.eu) under **Settings** > **Integrations** — see [Integrate PagerDuty](/integrations/integrate-pagerduty-with-round-robin/) or [Integrate OpsGenie](/integrations/integrate-opsgenie-with-round-robin/). Any existing rotation can be bound to an external schedule; there is no separate “external rotation” type to create.
1. In the dashboard, open the rotation and go to its **Edit Schedule** page.
2. In the schedule type picker, an **External** section shows a PagerDuty or OpsGenie card — only for providers you have connected.
3. Pick the provider, then search for and select the schedule you want to bind. A details panel shows the schedule before you commit.
4. Save. The rotation switches to external mode, and the first sync fills in members and the on-duty user.
Switching to external resets the rotation’s options and replaces any existing schedule with the external binding.
## Viewing an external rotation
[Section titled “Viewing an external rotation”](#viewing-an-external-rotation)
On the rotation’s page in the dashboard:
* The **Users** tab shows a read-only roster of everyone on the linked provider schedule, with an “N of M linked to Slack” badge, each member’s Slack link status, and who is on duty — including an unmapped on-duty person matched by email.
* The schedule card shows a read-only view of the external schedule, with a timeline of upcoming shifts, instead of the internal schedule details.
## How the sync works
[Section titled “How the sync works”](#how-the-sync-works)
On every sync, Round Robin:
1. Reads the linked schedule from PagerDuty or OpsGenie.
2. Matches each schedule participant to a Slack user **by email address**.
3. Overwrites the rotation’s member list with the matched users, and stores the schedule’s time zone.
4. Sets whoever is currently on shift as on duty, until the end of their shift. If nobody is on shift, the duty is cleared.
If the person currently on shift has no Slack account with a matching email, Round Robin tracks them as an **unmapped external duty**: the shift is still visible on the dashboard, but no Slack user is assigned.
Tip
Make sure people use the same email address in Slack and in your on-call provider — that is the only way Round Robin links the two identities.
External rotations still behave like any other rotation for everything Slack-facing: shift start and end notifications, channel topic updates, and on-duty mentions and templating work as usual.
## What you cannot change in Round Robin
[Section titled “What you cannot change in Round Robin”](#what-you-cannot-change-in-round-robin)
Because the external schedule owns the rotation, some features are disabled:
| Feature | Behavior on an external rotation |
| -------------------------- | ----------------------------------------------------------------------------------------------- |
| Members and user groups | Not editable — the on-call pool is synced from the provider and any change would be overwritten |
| Manual rotation / set duty | Blocked — duty is driven by the external schedule |
| Internal schedules | Blocked — you cannot add a Round Robin schedule on top |
| Business hours | Not available |
| Incoming webhooks | Not available |
To change who is on call, edit the schedule in PagerDuty or OpsGenie; Round Robin picks it up on the next sync.
## Disconnect an external schedule
[Section titled “Disconnect an external schedule”](#disconnect-an-external-schedule)
1. Open the rotation’s **Edit Schedule** page. External rotations show an **External Schedule** alert explaining that the schedule cannot be edited here.
2. Click **Disconnect external schedule** and confirm.
Disconnecting removes the binding, stops the sync, and reverts the rotation to **manual** mode. The current on-call pool (as last synced) is kept as the starting member list, so you can keep rotating the same people by hand or add a Round Robin schedule — see [Create or edit a schedule](/rotation-management/create-or-edit-a-schedule/). You can re-link an external schedule at any time.
# Out-of-office and availability
> Mark yourself unavailable so Round Robin automatically skips you when a rotation would put you on duty.
Round Robin can automatically skip rotation members who are away. When the duty plan is calculated, unavailable members are excluded for the affected period and, where possible, the next available member takes over.
There are two sources of out-of-office information:
| Source | Where you manage it | When it applies |
| ------------------------------------ | ------------------------------------------------------------------------------------------------------- | -------------------------------------------------------------------- |
| Availability settings | Dashboard, **Settings → Availability** | Always enforced, for every rotation in scope |
| Google Calendar out-of-office events | Your Google Calendar, synced via the [Google Calendar integration](/integrations/google-calendar-sync/) | Only if the rotation’s out-of-office consideration option is enabled |
The two work well together: keep recurring unavailability in your calendar, and use availability settings for one-off time away — or manage everything in Round Robin if you don’t use the calendar sync.
## Add an unavailability window
[Section titled “Add an unavailability window”](#add-an-unavailability-window)
You manage your own availability from the dashboard at [app.roundrobinbot.eu](https://app.roundrobinbot.eu). Each user configures their own windows; there is no Slack command for this.
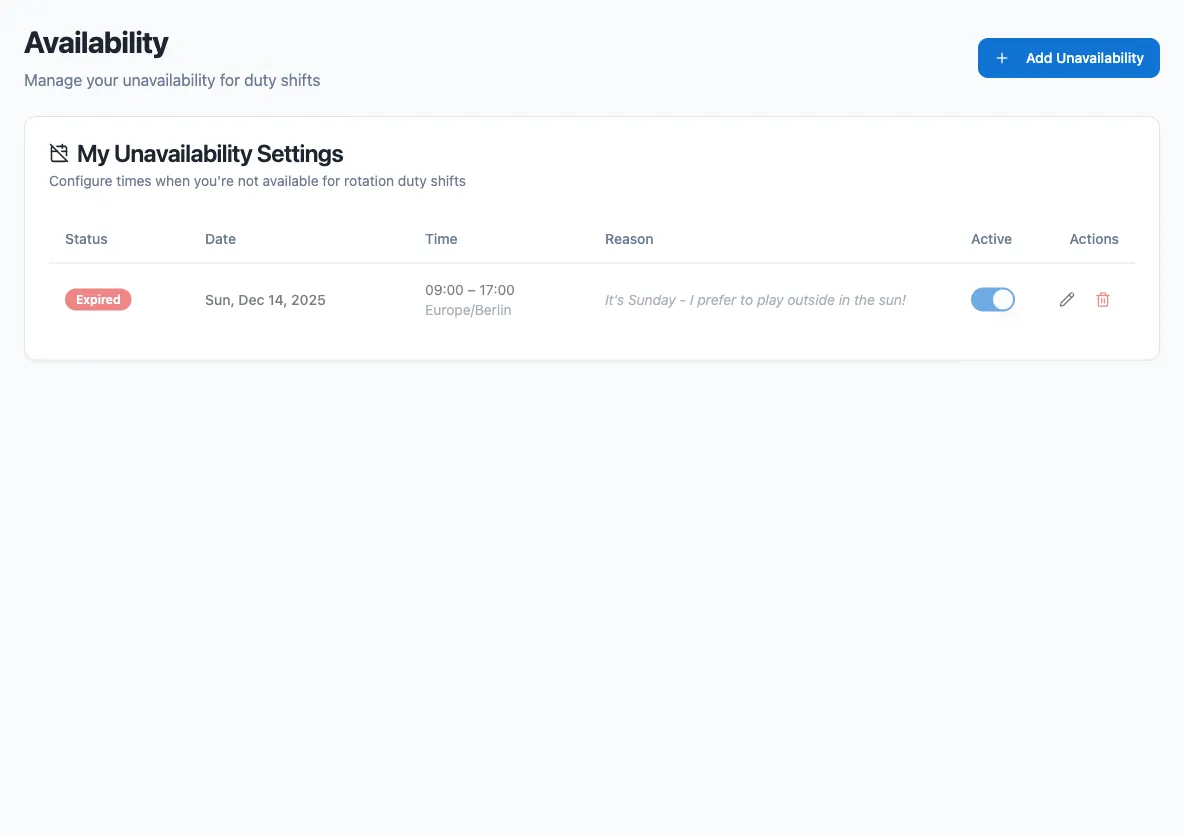
1. In the sidebar, go to **Settings → Availability**.
2. Select **Add Unavailability**.
3. Set the **start date and time** and the **end date and time**. Enable **Same day** for windows that start and end on the same date.
4. Pick the **time zone** the window should be interpreted in.
5. Optionally add a **reason** (for example, “vacation” or “doctor appointment”) — it is shown when you are skipped.
6. Choose the scope: **All rotations**, or **Specific rotations only** and pick the rotations it applies to.
7. Optionally set a recurrence (see below).
8. Save.
You can edit or delete windows from the same list at any time, and each window has an **Active** toggle so you can disable it temporarily without deleting it.
## Recurrence
[Section titled “Recurrence”](#recurrence)
A window repeats according to its recurrence rule:
| Rule | Behavior |
| -------------------- | --------------------------------------------------------------- |
| Does not repeat | A one-time window. |
| Daily | Repeats every N days. |
| Weekly | Repeats every N weeks on the selected weekdays. |
| Monthly (on day) | Repeats every N months on a fixed day of the month. |
| Monthly (on weekday) | Repeats every N months on the 1st–4th or last selected weekday. |
Recurring windows end either **after a number of occurrences** or **on a specific date**.
## How skipping works
[Section titled “How skipping works”](#how-skipping-works)
When Round Robin builds a rotation’s duty plan:
1. Your availability settings are checked first. They are always enforced — no rotation option is needed.
2. Google Calendar out-of-office events are checked next, but only if the rotation’s **Out-of-Office Time Consideration** option (under the rotation’s external calendar options) is set to consider them. See [Google Calendar sync](/integrations/google-calendar-sync/) for the details.
If a window overlaps a duty period, you are marked as skipped for that slot, together with the source (availability setting or Google Calendar) and the reason you provided.
When someone is skipped, the bot sends the rotation owners a direct message saying who was skipped, the reason, and the out-of-office period.
Note
Availability settings tell Round Robin when you are away; they do not change the rotation order itself. Skipped members simply do not appear in the plan for the affected slots.
# Install Round Robin and review its Slack scopes
> Install Round Robin in your Slack workspace and understand why each requested permission scope is needed.
To use Round Robin, a workspace admin (or a member allowed to install apps) adds it to your Slack workspace. During installation, Slack shows you the list of permission scopes the app requests. This page explains what each scope is used for, so you can review the request with confidence.
Round Robin uses granular bot permissions: every scope below is requested as a **bot token** scope, and the app requests only the scopes its features need. The installation never asks for user token scopes.
## Install the app
[Section titled “Install the app”](#install-the-app)
1. Open [the installation link](https://api.roundrobinbot.eu/api/install). It redirects you to Slack’s authorization page.
2. Review the requested permissions and select **Allow**.
3. Slack completes the installation and you can start using the `/rr` command and the [dashboard](https://app.roundrobinbot.eu).
Note
On Slack Enterprise Grid, installation happens at the organization level. After you approve the scopes, Slack takes you to the organization admin page where you choose which workspaces to add Round Robin to.
## Scope reference
[Section titled “Scope reference”](#scope-reference)
| Scope | Why Round Robin needs it |
| ------------------------------------------------------------------------------------------------------------------------------- | ---------------------------------------------------------------------------------------------------------------------------------------------------------------------- |
| [app\_mentions:read](https://api.slack.com/scopes/app_mentions:read) | Detect when the bot is @-mentioned in a channel it belongs to, so it can respond and route mentions to the person on duty. |
| [channels:read](https://api.slack.com/scopes/channels:read) | List public channels when you create or manage a rotation, and check the type of channel the bot is interacting with. |
| [channels:manage](https://api.slack.com/scopes/channels:manage) | Update the topic of a public channel with rotation information, and invite or remove members when a rotation keeps a channel’s membership in sync with who is on call. |
| [chat:write](https://api.slack.com/scopes/chat:write) | Post rotation messages in channels the bot was invited to. |
| [chat:write.public](https://api.slack.com/scopes/chat:write.public) | Post in public channels the bot is not a member of. |
| [commands](https://api.slack.com/scopes/commands) | Enable the `/rr` slash command and message shortcuts. |
| [groups:read](https://api.slack.com/scopes/groups:read) | List the private channels the bot is a member of when you manage a rotation, and check the channel type. |
| [groups:write](https://api.slack.com/scopes/groups:write) | Update the topic of a private channel the bot is a member of, and manage its membership when channel sync is enabled. |
| [im:read](https://api.slack.com/scopes/im:read) / [im:write](https://api.slack.com/scopes/im:write) | Open direct message conversations to send private notifications to individual users. |
| [reactions:read](https://api.slack.com/scopes/reactions:read) / [reactions:write](https://api.slack.com/scopes/reactions:write) | Support mention acknowledgment: when someone reacts to a message that mentions the on-duty group, Round Robin marks the mention as handled. |
| [team:read](https://api.slack.com/scopes/team:read) | Read basic workspace information, such as the workspace name, when Round Robin is installed. |
| [usergroups:read](https://api.slack.com/scopes/usergroups:read) | List existing Slack user groups so you can link one to a rotation. |
| [usergroups:write](https://api.slack.com/scopes/usergroups:write) | Create the on-duty user group and update its members so it always reflects who is currently on call. |
| [users:read](https://api.slack.com/scopes/users:read) | List workspace users when you create or edit a rotation. |
| [users:read.email](https://api.slack.com/scopes/users:read.email) | Match Slack users to accounts in external integrations, such as PagerDuty schedules and Google Calendar out-of-office events, by email address. |
## When Round Robin asks for new scopes
[Section titled “When Round Robin asks for new scopes”](#when-round-robin-asks-for-new-scopes)
When a new feature requires a scope your installation does not have yet, the [dashboard](https://app.roundrobinbot.eu) shows an **App Update Required** alert. Select **Reinstall App** to run the Slack authorization flow again with the updated scope list; your rotations and settings are preserved.
# Trigger rotations with webhooks
> Use incoming webhooks to rotate, set the on-duty user, or open a mention from external systems.
Every rotation exposes an incoming webhook: a unique URL plus a secret key that lets external systems — CI pipelines, schedulers, incident tooling — trigger actions on the rotation without going through Slack. In this guide you find your rotation’s webhook URL and key, then call it to rotate duty, set a specific user on duty, or open a mention.
## Find your webhook URL and key
[Section titled “Find your webhook URL and key”](#find-your-webhook-url-and-key)
1. Open the dashboard at [app.roundrobinbot.eu](https://app.roundrobinbot.eu) and go to your rotation’s details page.
2. Open the **Configure** menu in the toolbar and choose **Webhooks**.
3. Copy the **Rotation Webhook URL** and the **Secret API Key**. The key is hidden by default; use the eye button to reveal it or the copy button to copy it directly.
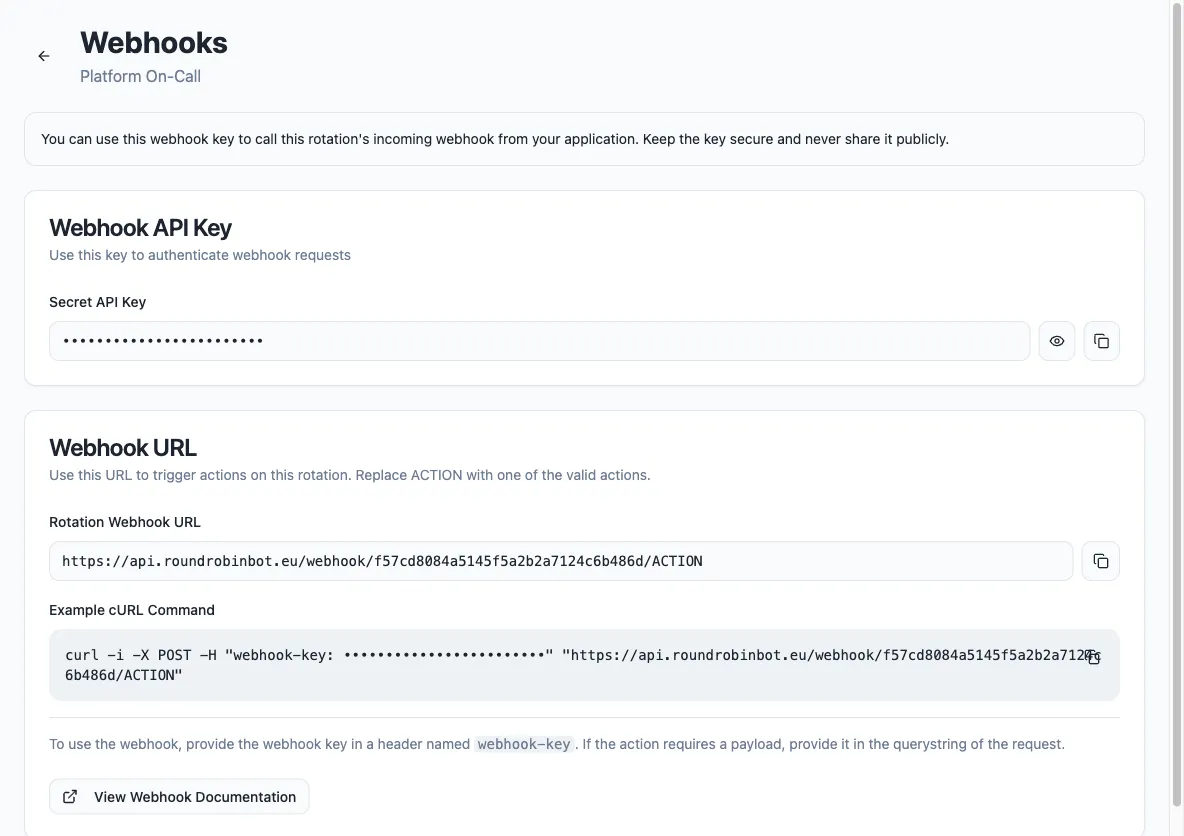
The webhook is created automatically the first time you open this page, and the same URL and key are shown on every later visit.
Note
Only users with edit permission on the rotation can view the webhook key, and the rotation must be enabled. Webhooks are not available for externally managed rotations (for example, rotations synced from PagerDuty or Opsgenie).
## Call the webhook
[Section titled “Call the webhook”](#call-the-webhook)
Send an HTTP `POST` to the webhook URL, replacing `ACTION` with one of the actions below. Authenticate with the secret key in a `webhook-key` header. If the action takes parameters, pass them in the query string.
```bash
curl -i -X POST \
-H "webhook-key: YOUR_SECRET_KEY" \
"https://api.roundrobinbot.eu/webhook/YOUR_WEBHOOK_PATH/rotate"
```
## Actions
[Section titled “Actions”](#actions)
| Action | URL segment | Query parameters | What it does |
| ----------- | ----------- | ------------------------------------------------------------------------------------------------------------------------------------------------------------------------------------ | ------------------------------------------------------------------------------------------------------------------------------------------------------------------------- |
| Rotate | `rotate` | None | Advances the rotation to the next user on duty. |
| Set on duty | `setonduty` | `email` (required) — the Slack email address of the user to put on duty | Sets an explicit user on duty. The user must be a member of the rotation. |
| Mention | `mention` | `userId` (required) — Slack user ID of the person asking for help; `channelId` (required) — Slack channel ID where the mention is answered; `message` (optional) — free-text context | Opens a mention on the rotation, notifying whoever is on duty, exactly as if the bot had been mentioned in Slack. See [What are mentions?](/mentions/what-are-mentions/). |
Example — set a specific user on duty:
```bash
curl -i -X POST \
-H "webhook-key: YOUR_SECRET_KEY" \
"https://api.roundrobinbot.eu/webhook/YOUR_WEBHOOK_PATH/setonduty?email=jane.doe@example.com"
```
## Errors
[Section titled “Errors”](#errors)
| Situation | Result |
| ------------------------------------------------------------------------------------------------------------- | --------------------------------------------------------------- |
| Missing `webhook-key` header | `401 Unauthorized` |
| Wrong secret key | Request rejected as invalid access code |
| Unknown action in the URL | `404 Not Found` |
| Rotation is disabled | Request rejected; enable the rotation first |
| `setonduty` with a missing email, an email that matches no Slack user, or a user who is not a rotation member | Request rejected with a validation error explaining the problem |
Caution
Treat the webhook key like a password. Anyone who has both the URL and the key can change who is on duty for the rotation.